mini_banner

Monday, December 24, 2007

Happy Holidays

pHreaK and I would like to wish all our readers a happy holiday. Thanks for reading and contributing to the site. Without your support this site would be nothing.

For any new readers who are thinking about installing Ubuntu on their new Dell Inspiron 1501s and have found this site, welcome. Check out the new user guides for help setting up Ubuntu and the general users guides for learning how to setup and tweak some of the best programs open source has to offer.
edited by pHreaksYcle

Thursday, December 20, 2007

Dell's Inspiron 1501 Service Manual

This is a direct link to Dell's Documentation Website

Inside you'll find complete guides for the:
Optical Drive
Hard Drive
Memory Module
Modem
Mini-Card
Hinge Cover
Keyboard
Display Assembly
Palm Rest
Coin-Cell Battery
Speakers
Processor Thermal-Cooling Assembly
Processor Module
Fan
ExpressCard/Hard-Drive Bay Assembly
System Board
Battery Latch Assembly
Flashing the BIOS
Pin Assignments for I/O Connectors

I was sent this a long time ago, It's about time I posted it.

Tuesday, December 18, 2007

Transparencies and Opacity in Compiz-Fusion

Another cool tweak for your menus. This adds a bit of transparency to your menus, drop down menus, tooltips, notifications and a few other small things. It gives them a clean look with just a hint of transparency.

In CompizConfig Settings Manager, under General Options, in the Opacity settings:

Screenshot

Select edit and copy this into the pop up window:
((type=Menu | PopupMenu | DropdownMenu | Tooltip | Notification | Combo | Dnd | name=sun-awt-X11-XWindowPeer) | (type=Normal & override_redirect=1)) & !(name=sun-awt-X11-XFramePeer | name=sun-awt-X11-XDialogPeer | name=gnome-screensaver)

I set the Opacity window values at 96-98, giving it a nice clean look. You can set it to whatever you like. I think everyone should check this tweak out, it really pretties up the desktop.

Sunday, December 16, 2007

Speed Up Gnome's Menus

This a simple 3 step tweak that really speeds up your gnome menus. It just removes the built in delay.

Step 1: Create A Text File
In a terminal type:
sudo gedit ~/.gtkrc-2.0

Screenshot-red@red-desktop: ~


Step 2: Write The Text File
In the text file that is created paste:
gtk-menu-popup-delay = 0"| tee -a .gtkrc-2.0

Screenshot-*.gtkrc-2.0 (-home-red) - gedit

Now save and close

Step 3: Log out
When you log back in you should see a significant speed increase in you Gnome menus.
edited by pHreaksYcle

Friday, December 14, 2007

getdeb.net

I stumbled across a pretty useful website the other day at www.getdeb.net. It has a bunch of precompiled .deb files, making it easy to check out of some the newest and most exciting open source software.

Screenshot-GetDeb - Software you want - Mozilla Firefox-2

What's a .deb?
A .deb file is the Ubuntu equivalent of an Windows .exe. It' s Ubuntu's way of standardizing package installation and securing system stability. The .deb files have all the necessary information and dependencies to make installation and removal painless. Compiling software is still a viable method of program installation in Ubuntu it just doesn't have dependency and uninstallation information built in. Deb's maintain system stability. With a standardized method of installation and removal, you don't have to worry about the old Linux problem of dependency hell. When installing a .deb Ubuntu's package manager apt will be able to monitor all dependencies. Nothing can be installed without satisfying those dependencies and dependencies will not be removed when installing programs if they are needed by other programs.


Installing a .deb
Installing a .deb works very much like installing an .exe on windows. A window will pop up telling you what you are installing and a couple of mouse clicks starts the automated installation.

package_installer

What's on getdeb.net?
On getdeb.net you can get the latest bleeding edge releases of programs that wouldn't be available in the Ubuntu repositories until another distro release. As well as, .debs for smaller open source projects. Not every project is Ubuntu specific or has the time to compile a deb for Ubuntu users. If program A is only released as a tarball, most users would be able to install it with a little help. But satisfying the dependencies, removal and system stability all could be theoretically compromised. Thanks to getdeb.net these smaller projects get the ease of installation and system stability of having a .deb.

Advantages to using getdeb.net
The current Ubuntu official packages update policy is limited to critical bug fixes, meaning after each release there will be no regular bug fixes or improvement updates. This is a good practice for stability purposes specially if you are planning to do an enterprise level support but for you the user it means that until the next release you will not be able to get the latest and greatest software versions for your system.

Experienced users and developers will be able to compile and install from the source but unskilled users which would like to try the latest versions will be complaining about how hard it is to compile software packages, especially those which depend on several development libraries.
This policy is also a limitation for the emerging applications which will not be available on the official repositories and consequently not getting the proper recognition, something that they can get by being easily available to the end users.

Disadvantages to using getdeb.net

Installing .debs from 3rd parties (not officially from Ubuntu) always runs a risk. This Ubuntu forums post illustrates it. When installing a .deb, you give the installer root privileges, it has full access to install and remove anything on your computer. It needs root access to install and satisfy dependences, but if used maliciously it could install key loggers, spyware, viruses or simply delete your system files. This is why it is important to know and trust any site you download a .deb file from. getdeb.net is a trustworthy site and used by hundreds of Ubuntu users, but a warning needed to be issued.

I hope you enjoy getdeb!

Thursday, December 13, 2007

Happy Birthday pHreaksYcle

Today is an important day in the Ubuntu community. It's Ubuntu1501's editor pHreaksYcle's birthday. So everyone wish him a happy birthday!

pHreaksYcle done an excellent job since joining the team, thanks to him all the articles have been edited. He also is finishing up his second article and turning into quite the Ubuntu power user.

Leave some love after the break for the pHreak. Hopefully he'll have edited this article before most of you read this.
edited by pHreaksYcle

Saturday, December 8, 2007

Installing Wine in Gutsy Gibbon

Wine is a software application which aims to allow Unix-like computer operating systems on the x86 architecture to execute programs that were originally written for Microsoft Windows.

There are two methods to installing Wine in Ubuntu 7.10 Gutsy Gibbon

1. Install Wine from Ubuntu's own repository, older but offically supported version.
In a terminal type:
sudo apt-get install wine

2. Add Wine's own repository and download the lastest bleeding edge version.
In a terminal type:
sudo wget http://wine.budgetdedicated.com/apt/sources.list.d/gutsy.list -O /etc/apt/sources.list.d/winehq.list

Add Wine's repository key.
Ina terminal type:
wget -q http://wine.budgetdedicated.com/apt/387EE263.gpg -O- | sudo apt-key add -

Update your sources.
In a terminal type:
sudo apt-get update

Download Wine
In a terminal type:
sudo apt-get install wine

Once installed (either method) you can configure Wine by running:
winecfg

Ken pointed out, that you can change the wine color scheme to match Ubuntu.

Ina terminal type:
gedit ~/.wine/user.reg

Replace the [Control Panel\\Colors] section with

[Control Panel\\Colors] 1176981676
"ActiveBorder"="239 235 231"
"ActiveTitle"="203 133 61"
"AppWorkSpace"="198 198 191"
"Background"="93 77 52"
"ButtonAlternativeFace"="200 0 0"
"ButtonDkShadow"="85 85 82"
"ButtonFace"="239 235 231"
"ButtonHilight"="255 255 255"
"ButtonLight"="255 255 255"
"ButtonShadow"="198 198 191"
"ButtonText"="0 0 0"
"GradientActiveTitle"="239 235 231"
"GradientInactiveTitle"="239 235 231"
"GrayText"="198 198 191"
"Hilight"="246 200 129"
"HilightText"="0 0 0"
"InactiveBorder"="239 235 231"
"InactiveTitle"="239 235 231"
"InactiveTitleText"="255 255 255"
"InfoText"="0 0 0"
"InfoWindow"="255 255 166"
"Menu"="239 235 231"
"MenuBar"="239 235 231"
"MenuHilight"="246 200 129"
"MenuText"="0 0 0"
"Scrollbar"="239 235 231"
"TitleText"="255 255 255"
"Window"="255 255 255"
"WindowFrame"="0 0 0"
"WindowText"="0 0 0"

Thursday, December 6, 2007

Overview of Ubuntu 7.10 Gutsy Gibbon on the Dell 1501

Everything you need to get Ubuntu 7.10 running on your Dell Inspiron 1501.

Installation
Gutsy installs with no problems. There is a problem with GRUB, the resolution settings are wrong and this causes a 2 -3 minute lag in booting. Once done, Gutsy takes less than 25 seconds to load. You can find the guide on how to fix it here.

Wireless
Two Methods:
1. The Restricted Driver Manager can install the the firmware for the Broadcom 43xx card in the Dell 1501. You can find the guide .

2. You can use ndiswrapper to install the driver. For the guide and maybe why you'd want to do it yourself, check out this article.


ATI Proprietary Driver
Two Methods:
1. The Restricted Driver Manager can install the the driver for ATI graphics card in the Dell 1501. ATI's 8.37.6 fglrx driver is automatically installed, configured and 3D enabled. You can find the guide here.

2. You can install the newest ATI driver that uses AIGLX yourself. You can find that guide here.

Compiz-Fusion
Compiz-Fusion is enabled by default, so you don't have to install anything. If you used ATI Propiety Driver method 1, use need to setup Xgl using this guide to get Compiz-Fusion working. If you used ATI Propiety Driver method 2, Compiz works after a logout/reboot.

Media Codecs
Gutsy makes codec installation easy, no more automatix or struggling with adding repos. mp3, DVD, avi, aac, mpeg, wmv, asf, mov, flv, mp4, flash codecs are installed when you try to play them. If you like to add all the major codecs and make playback easy, check out my codec cheatsheet. The only thing not enabled in Ubuntu is reading encrypted DVDs. To add DVD playback to Ubuntu follow this guide.

Ethernet
Works out of the box. In order to do any of these guides you're going to need to plug in your Dell Inspiron 1501. Don't be cheap, go out and buy an Ethernet cable.

Brightness & Volume
Works with BIOS 1.70, use this guide for rolling back you BIOS.

Suspend & Hibernate
Doesn't work if you install the Proprietary ATI Driver (either method). A bug in ATI's driver causes this. No fixes have been found yet. If you use the MESA driver that is installed by default suspend and hibernate will work.

Video Out
Works out of the box, Gutsy's Screens and Resolutions (System>Administration>Screens and Resolutions) makes using multiple monitors a breeze. Configuration doesn't require editing your xorg.conf file.

Modem
Works, you just need to follow this guide to set it up.

Card Reader
Works out of the box.
edited by pHreaksYcle

Conexant Modem Driver for Gutsy

If you upgraded an Ubuntu 7.04 installation to Ubuntu 7.10, your modem will no longer work. You need to install the new deb. If you have the older version of the Conexant Modem driver, please uninstall it before installing the new one.

You can find the driver here. This is only for the 32bit version of Ubuntu. 64 bit users will need to go here. There is no deb for the 64bit driver so installation is a bit of a chore.

After installing the modem driver, you might get a pop-up window telling you that the Volume Control has quit unexpectedly and asks you to reload (or not reload) the panel. Click on Reload. Afterwards, the sound icon on the top right corner of the screen changes to "mute", but sound should be OK. A logout/login or GDM restart clears the issue. This issue happens because the modem driver lays down its own set of sound codecs and unloads the snd-hda-intel module during the installation process.


Step 1 - Install the Package
package_installer

installing_modem

Step 2 - Reolad
volume_control


Step 3 - Check the Restricted Driver Manager
System>Administration>Restricted Driver Manager
modem_check

Thanks go to Alex Kriegisch for pointing this out.
edited by pHreaksYcle

Tuesday, December 4, 2007

Installing VirtualBox with USB Support

VirtualBox
VirtualBox by InnoTek is a commercial and proprietary (with a limited GPL version) x86 virtualizer for Linux. It works fast and I like it more than VMware. For more info, check out it's wiki page. This guide will show you how to install both versions, the Open Source (OSE) and the Personal Use & Evaluation License (PUEL).

The Open Source Edition
This version of Virtualbox is released under the GPL. It does not have USB support and Virtual Remote Desktop support. It is the free as in freedom version and the easier of the two to setup. If you don't need USB or remote desktop support this method may be the one for you.

Download Virtualbox & Dependencies
In a terminal type:
sudo apt-get install virtualbox-ose virtualbox-ose-source

Prepare the source for kernel
In at terminal type:
sudo m-a prepare

Then install
In a terminal type:
sudo m-a auto-install virtualbox-ose

Add yourself as a virtual box user
In a terminal type:
sudo adduser username vboxusers
You must replace userame with your user name!


Personal Use & Evaluation License Version
The PUEL version has both USB support and Virtual Remote Desktop support. It is proprietary, but is available as a free download. It's my preferred version of VirtualBox.

Step 1: Download and Install VirtualBox

You can download the PUEL version of Virtualbox from Innotek website here.
Once your download is complete double click the .deb file and install VirtualBox.


Step 2: Setup User groups & USB support
Add yourself as a virtual box user
In a terminal type:
sudo adduser username vboxusers
You must replace userame with your user name!

Add USB support to you fstab file
In a terminal type:
sudo gedit /etc/fstab

And paste this line to the end of your fstab
none /proc/bus/usb usbfs devgid=1001,devmode=664 0 0

Enable USB
In a terminal type:
sudo gedit /etc/init.d/mountdevsubfs.sh

You need to look for this section:
#
# Magic to make /proc/bus/usb work
#
#mkdir -p /dev/bus/usb/.usbfs
#domount usbfs "" /dev/bus/usb/.usbfs -obusmode=0700,devmode=0600,listmode=0644
#ln -s .usbfs/devices /dev/bus/usb/devices
#mount --rbind /dev/bus/usb /proc/bus/usb

And delete all the # shown, it should look exactly like this.

#Magic to make /proc/bus/usb work

mkdir -p /dev/bus/usb/.usbfs
domount usbfs "" /dev/bus/usb/.usbfs -obusmode=0700,devmode=0600,listmode=0644
ln -s .usbfs/devices /dev/bus/usb/devices
mount --rbind /dev/bus/usb /proc/bus/usb

Find your vboxusers number
In a terminal type:
sudo gedit /etc/group

Look for this, the number following it is your vboxusers number
vboxusers:x:NUMBER

Next you have to add a line to your /etc/fstab to allow usb mounting
In a terminal type:
sudo gedit /etc/fstab

Add this line:
none /proc/bus/usb usbfs devgid= enter
vboxusers number HERE,devmode=664 0 0

Allow access to /proc/bus/usb/
in a teminal type:
sudo chown -R root:vboxusers /proc/bus/usb

Once you Log out or reboot, you can start VirtualBox (Applications>System Tools>Innotek VirtualBox)


Step 3 - Configuring VirtualBox
When you first run VirtualBox there is a wizard that automates setting up your virtual machine. Follow the steps, it's incredibility easy.

Once you have setup up your VM you should configure a couple of things in Settings.

First enable IO APIC
enable_io

Then enable USB, and add the USB devices to your VirtualBox with the green USB icon. Deivces must be plugged in for this to work. Use the green and red USB icons to add and remove USB devices.
enable_usb

Sunday, December 2, 2007

Installing the Newest ATI Driver with AIGLX

ATI's fglx video driver an be installed in two different ways in Ubuntu.

The first method installs the driver using Ubuntu's default fglx driver that is maintained in the officially supported restricted repository. It is as simple as selecting a box in the Restricted Driver Manager or synaptic and Ubuntu configures everything. This method gives you a stable driver with bug fixes. The only draw back is that you don't get the newest drivers. ATI releases a new driver just about every month and lately the ATI fglx driver has seen a major overhaul. The only way to install the newest fglx driver is to use the second method.

The other method involves you downloading and compiling the driver yourself. This method gives you the newest driver but doesn't give you any bug fixes or automatic configuration. What it will give you is a chance to use ATI Catalyst 7.11 driver which uses AIGLX. AIGLX allows you to run hardware accelerated rendering over the GLX protocol, eliminating the need to use XGL for hardware acceleration. AIGLX support is built into xorg and allows for a faster, less buggy Compiz Fusion experience. There is a great HowTo written on the Unofficial ATI Linux Driver Wiki, I couldn't have written a better guide.


...or You Could Use Envy
Envy will download the newest ATI fglx driver and automatically install and configure it for you. It does all the steps that are outlined in the Unofficial ATI Linux Driver Guide. It incredible easy and safe.

Step 1
Download Envy

Step 2
Uninstall any previous ATI fglx drivers you have installed. If you installed fglx driver via the Restricted Driver Manager all you need to do is go to System->Administration->Restricted Driver Manager and unselect the enable box.
restricted_ati
You will have to reboot for the changes to take effect.

To test if you have properly uninstalled the old ATI driver
In a terminal type:
glxinfo

You should see something similar to this:
OpenGL vendor string: Mesa project: www.mesa3d.org
OpenGL renderer string: Mesa GLX Indirect
OpenGL version string: 1.4 (2.1 Mesa 7.0.1)
(You do not want to see any mention of the ATI driver only mesa)

You also need to uninstall xserver-xgl
In a terminal type:
sudo apt-get remove xserver-xgl


Step 3 - Install Envy
Double click the .deb package you downloaded to install Envyinstalling_envy


Step 4 - Use Envy To Install Driver
To start Envy Go to Applications->System Tools->Envy.
Select the Install ATI Driver Option.
envy
You will have to reboot for the changes to take effect.


Step 5 - Confirm it Works
In a terminal type:
fglrxinfo

You should see this output:
display: :0.0 screen: 0
OpenGL vendor string: ATI Technologies Inc.
OpenGL renderer string: ATI Radeon Xpress Series
OpenGL version string: 2.1.7059 Release

Go to the Restricted Drivers Manager (System->Administration->Restricted Driver Manager). You should see the ATI driver in use but the enable box unselected.
DO NOT ENABLE THE DRIVER.

confirmation_RDM

Congrats You're done!

* Note Suspend & Hibernate still do not work on the Dell 1501, even with the newer ATI drivers.
edited by pHreaksYcle

Backlight & Brightness Fix

The brightness controls (Fn+the up and down arrows) don't seem to be working for many people in Gutsy. There is a very easy fix for this, use BIOS 1.70.

You Can Find BIOS Version 1.70 on Dell's Driver Website Here

The bad news is that it is a Windows process, meaning you have to do it in Windows. The good news is that it a completely automated process and impossible to mess up. All you have to remember is that you need to have your Inspiron plugged in when you update the BIOS. If your not plugged in, you'll brick your laptop.

There are other ways to update your BIOS, but I don't feel comfortable writing a guide or recommending them to my readers. So many things can go wrong, especially when updating via the DOS command line.
edited by pHreaksYcle

Friday, November 30, 2007

Wireless in Gutsy Gibbon with Ndiswrapper

Back when the Dell 1501 first came out there were no native wireless drivers for the internal Broadcom chipset, so we had to use Nidiswrapper. NdisWrapper uses a wireless devices' Windows driver in Linux. It works surprisingly well. Using ndiswrapper allows you to run the Broadcom card in your Dell 1501 at full speed and connect to certain networks that the native Broadcom driver can't. You won't surf the internet faster but your PC to PC connections will be faster. If you are using the native Broadcom driver via the Restricted Driver Manager and it's working for all your day to day needs, I wouldn't recommend taking the time to change drivers.

If you have already enabled the Broadcom restricted driver, uninstall it before attempting this guide.

Go to System>Administration>Restricted Driver Manager and unselect the enable box.
restricted_ati

Step 1: Get Needed Packages
To install ndiswrapper
In a terminal type:
sudo apt-get install ndiswrapper-utils-1.9 ndiswrapper-common

Get the Windows driver for your Dell 1501
In a terminal type:
wget http://ftp.us.dell.com/network/R140747.EXE

Step 2: Get Everything Ready
Now we will make a folder.
In a terminal type:
mkdir ~/.drivers

Now we will move R140747.EXE (the Dell driver), to the folder we just made.
In a terminal type:
mv ~/R140747.EXE ~/.drivers

Finally, we need to blacklist the broken and useless bcm43xx firmware drivers that try to load in a default Ubuntu install:
In a terminal type:
sudo su
Then type:
sudo echo blacklist bcm43xx >> /etc/modprobe.d/blacklist

YOU MUST REBOOT NOW!
In a terminal type:
sudo reboot

STEP 3: Get The Proper Folder
In order for us to unzip the R140747.EXE driver we need to point your terminal to the /.driver folder.
cd ~/.drivers

Unzip the R140747.EXE driver
In a terminal type:
unzip -a R140747.EXE

We need to point your terminal to the DRIVER folder we just unzipped
In a terminal type:
cd ~/.drivers/DRIVER

Step 4: Configure the Windows driver with ndiswrapper
Now install the Windows driver
In a terminal type:
sudo ndiswrapper -i bcmwl5.inf
Then:
sudo ndiswrapper -l (that is a lowercase L)

You should see a message that says driver present, hardware detected.

Now finish installing the driver
In a terminal type:
sudo ndiswrapper -m
Then:
sudo modprobe ndiswrapper

YOU MUST REBOOT NOW!
In a terminal type:
sudo reboot

STEP 5: TEST WIRELESS
Your WiFi light on your laptop should be illuminated. If not, you can always turn it on and off with the Fn+F2 (Function & F2 Key) and you're all set! Try running this to see if your wireless card is functioning properly.

In a terminal type:
sudo iwlist scanning

If once you get everything working and after a reboot and the wifi light does not come back on, simply repeat Step 4 and wireless will work again.


Step 6: Make it Stick
To autostart the ndiswrapper module
In a terminal type:
sudo gedit /etc/modules

and add this to the end of the file
ndiswrapper
edited by pHreaksYcle

Fix For Gutsy Taking Forever to Boot/Load

Readers have complained that Ubuntu 7.10 Gutsy Gibbon has been taking forever to load. Once GRUB loads the screen goes black for 2 - 3 minutes. It seems not everyone is having this problem, but for those who have been, there is a very simple and easy fix. You can find the fix on the Ubuntu forums here. Your resolution for the Dell Inspiron 1501 should be 1280 by 800.

Now for my HowTo:

First you need to change your splash resolution settings.

In a terminal:
sudo gedit /etc/usplash.conf

You need to edit the file to look like this:
usplash_conf
xres=1280
yres=800

Then to make the changes stick:

In a terminal type:
sudo update-usplash-theme usplash-theme-ubuntu

This is what your terminal output should look like:
terminal


Now you shouldn't have to wait 2 -3 minutes for your computer to load.

This information was passed onto me by a reader named Matt. Thanks Matt!
edited by pHreaksYcle

Saturday, November 24, 2007

Non-Distro Specific Ubuntu Guides

This is a collection of all the howto's on Ubuntu1501.com that aren't distro specific and offer you a chance to enhance your Ubuntu experience.

How Get Ubuntu

Customizing Firefox

Configure the Touchpad

Dual Booting with Windows or another OS

Replacing your Hard Drive

Installing VirtualBox with USB Support


Upgrading your RAM

How to BitTorrent

How to run uTorrent torrent client in Ubuntu

Using Evolution with Gmail

How to Encode Videos for your iPod

How to get FREE Ubuntu disks

How to get FREE Ubuntu system stickers

Integrate Last.fm into Ubuntu

Using Your Apple iPod in Ubuntu

Using KDE Applications in GNOME

Running the Conky System Monitor

How to Install a TTF Font in Ubuntu

How to Screen Capture

Fixing Dell Laptop Keyboards

Make Firefox Pretty

Sunday, November 18, 2007

Using Evolution with Gmail

Evolution is the official personal information manager and workgroup information management tool for GNOME. It combines e-mail, calendar, address book, and task list management functions. It's user interface and functionality are similar to Microsoft Outlook. It can be connected to a Microsoft Exchange Server using it's web interface and an Evolution add-on. Using gnome-pilot, it may be synchronized with most Palm devices, and OpenSync enables it to be synchronized with mobile telephones and other PDAs.
From Wikipedia

I really dig Evolution. I used to be a huge Mozilla Thunderbird user and still think it's a great email client. I find Evolution integration with the Gnome desktop and it's ability to do all things that I did in Thunderbird makes T-Bird an unnecessary install on my systems. I'm not saying one is better than the other, but if you'd like to use e-mail client in Ubuntu, check them both out. If you find you need help setting up Evolution with your Gmail account, this guide will get you setup in less than five minutes. I wrote out what to put in the fields as well as took pictures. If you are having trouble, just make sure your Evolution looks like mine.

When you first run Evolution or when you go to: Edit->Preferences in Evolution, the Account Editor opens up. From here you can configure Evolution to send and receive email from your Gmail account.

Identity:
indentity

Name: Name your account.
Full Name: Write Your Name.
Email Address: You have to put your full Gmail user name and include the @gmail.com


Receiving Email:
recieving

Server Type: POP
Server: pop.gmail.com
Username: You have to put your full gmail user name and include the @gmail.com
Security: SSL encryption
Authentication Type: Password Check for supported types


Receiving Options:
recieving_options

- You can set Evolution to automatically check for new mail every set number of minutes
- You want to check the leave messages on server box if you want a copy of your email kept on Google's Gmail server. (I prefer this option so I have access to all my email whether I'm at my laptop of not)
- Set Evolution to delete mail that is older than a set amount of days


Sending Email:
sending

Server Type: STMP
Server: smtp.gmail.com
- Check the box server requires authentication
Use Secure Connection: SSL encryption
Authentication Type: Plain Check Supported Types
Username: You have to put your full Gmail user name and include the @gmail.com


Enabling Evolution to download and Send Email:
- Go to www.gmail.com

gmail
Click the picture for a larger view

- Log into your gmail account, select Settings in the upper right hand corner of the window
- In the settings tab, select Forwarding and POP/IMAP
- In the Forwarding and POP/IMAP tab, look for POP Download and enable POP. This can either be set for all your Gmail email you have on the server or for just email that arrives after you enable it.
edited by pHreaksYcle

Sunday, November 11, 2007

We're Moving On Up

I'm sure you most of you have noticed but we've moved. I've bought the url www.ubuntu1501.com and all traffic from www.ubuntu1501.blogspot.com is being rerouted to our new home. I really just got tired of having to spell out blogspot. Please update your RSS feeds and bookmarks accordingly.

I've been blogging about running Ubuntu on the Dell Inspiron 1501 for almost a year and I never thought the site was going to be this big. I started blogging thinking if 10 or 20 people read one of my articles, I'd consider myself successful. Then, I thought I was big when I thought I was getting about 50 readers a day. Once I started looking at the numbers I realized a hundreds of people were reading my blog. Today a little over 1,000 unique IPs log onto the site everyday. My guides have been used for the Ubuntu online documentation, translated into a bunch of different languages, linked to on a bunch of mobile Linux sites, referenced in bigger tech blogs, and the site has been referenced in the Ubuntu forums. I think I've come a long way, I feel like my guide writing is really come into it's own. Here's an example, my first guide on how to install Ubuntu 6.10 Edgy Eft and my latest guide about encoding videos for the iPod. The difference is amazing.

I owe all my success to you guys and girls who have been reading my blog and helping with all the feedback. Thanks from the bottom of my little open source fanboy heart.

Keep On Reading,
redDEAD

P.S. Two things:
1. I really could use a waffles.fm, what.cd or Demoniod type site invite, since oink.cd and Demonoid were shut down I've really been lost for a good Demonoid type torrent site and a good music torrent site.
2. In a case your wondering about how to get in contact with me, you can always catch me on AIM (pidgin) as redDEADresolve or redDEADresolved and via email at redDEADresolve at gmail.com. I don't mind helping you troubleshoot any problems.

Easy Codec Install for Gutsy

This simple howto installs the most common restricted codecs in Gutsy, allowing you to play mp3, aac, DVD ,mp4, avi, wmv and many more formats. It also installs the codecs for ripping mp3 using the lame encoder in Soundjuicer and making CDs from mp3s in K3b.

This is rewrite of a howto that I did for Feisty and it just needed a little touch up for Gutsy.

In a terminal type:
sudo apt-get install gstreamer0.10-plugins-ugly-multiverse gstreamer0.10-plugins-bad-multiverse gstreamer0.10-plugins-bad gstreamer0.10-plugins-ugly gstreamer0.10-ffmpeg libxine1-ffmpeg libdvdread3

In order to play copyrighted DVDs, you need to install the libdvdcss2 package. To do this you need to install the Medibuntu repository. You can find my howto here.

Once you install the Medibuntu repository, in a terminal type:
sudo apt-get install libdvdcss2
edited by pHreaksYcle

How To Encode Videos for Your iPod

This works for any media device, or if you you just want to convert video files to other formats.

We're going to use the command line conversion tool ffmpeg, it's incredibly fast and does a great job. Don't be scared, because we also going to install and use a GUI for the ffmeg tools so we can convert video with a pretty interface.

First thing we have to do is install the version of ffmeg that allows encoding in mp4. To do this we need to install the Medibuntu repository.

This will add the Medibuntu repository to your repository lists
In a terminal type:
sudo wget http://www.medibuntu.org/sources.list.d/gutsy.list -O /etc/apt/sources.list.d/medibuntu.list

Then you have to add the GPG Key to authentic the packages
In a terminal type:
wget -q http://packages.medibuntu.org/medibuntu-key.gpg -O- | sudo apt-key add -
Now update your system to load the Medibuntu repository into your apt-get sources
sudo apt-get update

Now download the Medibuntu version of ffmeg that allows for mp4 encoding/converting video for your iPod
sudo apt-get install ffmpeg
You may have to update your system again
In a terminal type:
sudo apt-get update

Now we can convert video for your iPod. FFmpeg is a command line tool and is a bit difficult for seasoned command line warriors to use. In order to make things as easy and simple we can download a GUI (graphical user interface) for the ffmpeg tools.

WinFF is a cross platform batch GUI for FFMPEG. It will convert most any video file that FFmpeg will convert. WinFF does multiple files in multiple formats at one time. You can for example convert mpeg's, flv's, and mov's, all into avi's all at once.

Download WinFF 0.31 for Ubuntu Here this is for the 32 bit version

Once your download completes, double click the winff-0.31-i386.deb to install it onto your system.

To run WinFF go to Applications>Sound & Video>WinFF

You should see this:

ffmpeg_first

You can select options in the upper right corner of WinFF and a drop down menu will appear and you will see this:

ffmpeg_main

You can choose where you want the files you are converting to be saved as well as what format you want to convert to. I choose usually use the XviD for iPod or H.264 High Quality settings. I find XviD for iPod encodes faster and gives excellent picture quality.

You can also go to WinnFF>Edit>Preferences to futher customize WinFF.

ffmpeg_configure

Anyone running a dual processor will want to check the box off that says, "Multithreadng for Dual Core Processors"

Have Fun!
edited by pHreaksYcle

How to Play Encrypted (Copyrighted) DVDs in Gutsy

Ubuntu 7.10 Gutsy Gibbon does not play DVDs out of the box. In order to play DVDs you need to install the Medibuntu Repository and a couple of packages. This guide will get your Gutsy install playing DVDs like a champ in less then 4 minutes.

This will add the Medibuntu repository to your repository lists
In a terminal type:
sudo wget http://www.medibuntu.org/sources.list.d/gutsy.list -O /etc/apt/sources.list.d/medibuntu.list

Then you have to add the GPG Key to authentic the packages
In a terminal type:
wget -q http://packages.medibuntu.org/medibuntu-key.gpg -O- | sudo apt-key add -

Now update your system to load the Medibuntu repository into your apt-get sources
sudo apt-get update

Download the DVDs playback packages
In a terminal type:
sudo apt-get install libdvdcss2 libdvdread3

Now pop in a DVD and enjoy!
edited by pHreaksYcle

Saturday, November 10, 2007

Compiz-Fusion with XGL in Gutsy

This guide only works for Ubuntu 7.10 Gutsy Gibbon, but works for any one who is using an ATI card in Gutsy.

This is the easiest Compiz install ever. Compiz-Fusion is enabled by default, so all you have to do is setup XGL, install the CompizConfig Setting Manager and configure Compiz-Fusion.

In a terminal type:
fglrxinfo

You should see:
display: :0.0 screen: 0
OpenGL vendor string: ATI Technologies Inc.
OpenGL renderer string: ATI Radeon Xpress Series
OpenGL version string: 2.0.6473 (8.37.6)

If not, make sure you enable the restricted ATI driver via the restricted driver manager. Check your restricted driver manager by going to System>Administration>Restricted Driver Manager. Make sure the box is checked as illustrated bellow.

restricted_ati

Once you have the ATI driver setup you need to install Xgl and the CompizConfig Setting Manager.

In a terminal type:
sudo apt-get install xserver-xgl compizconfig-settings-manager

terminal_code

Once everything is done downloading you should see this:

xgl_server

Ubuntu will install and setup Xgl to run with you normal gnome desktop. It will also run Compiz-Fusion for you at startup.

Log off your current session or restart your computer. Go to System>Preferences>Appearance and select the Visual effects tab.
You will see this:

apperance_preference

Select the Custom and edit you Preferences. Now you should be able to get your all you pretty eye candy setup.

You can check my custom preferences by downloading this file, and loading it through the CompizConfig Setting Manager.

You can find it under System>Preferences>Advanced Desktop Effect Settings or running ccsm in a terminal.

It look like this:
ccsm

To install my profile just select the Preferences option in ccsm and Import it.
edited by pHreaksYcle

Tuesday, November 6, 2007

New Staff Member

If you've read this blog for any length of time, you would have noticed my poor writing skills. I have a hard time proof reading my own work, organizing my thoughts clearly and I just plain suck at spelling. Good news is that I found someone to edit the blog for me. Dan volunteered to go through the archives and clean up my sloppy work and edit all my new articles. So let's all welcome him to the ubuntu1501 family. I made him answer a couple of questions, so we all could get that warm fuzzy feeling of "getting to know" him.

What your name?
dan AKA pHreaksYcle

What do you do?

Student, but work part time as a cashier at a service station

What do you study?

Chemistry, geometry (pHreak is still in high school)

How long have you been using Ubuntu?

Hardcore since September, but dabbled with it last year as well...never switching back

Why did you switch?

I switched because of many things, all surrounding the fact that I hate Windows. I don't hate windows because its not Linux, i hate windows because they do things i do not agree with, software-wise and politics-wise, like contracting schools to only use MS products is bullsh*t. Things like that make me sick.

What kind of rigs do you having running at your house?
I have 2 desktops and 2 laptops. Laptop 1, mine, runs Ubuntu, but has Vista partition because I haven't gotten WINE yet. Laptop 2 has Vista solely. It isn't mine. Desktop 1 runs Ubuntu clean. I use it to listen to music on my surround sound and as a backup for my laptop files. It is shit, but it runs.

What do you do to earn your geek street creditability?
I go to my schools computer club weekly and win every game. We usually play games like Unreal Tournament, but winning is still important. I fix all of my families computer problems on their Windows PCs (what a surprise). At the moment, I am looking into putting Linux on my PlayStation Portable (PSP).

Anything else you want to tell us about yourself?
I play hockey, race sprint cars, and type really fast. I kick @$$ in first person shooters, used to play WarRock a lot, but I have become sick of the server lag and I'm in between games.

Closing thoughts?
Linux is my religion.


Hey, I'm just happy that I don't have to endure anymore email about my writing or spelling.
Edited by pHreaksYcle

Monday, November 5, 2007

Moved This Week

For those of you who have emailed, instant messaged and commented on articles, I'm sorry for not getting back to you. I moved last Sunday and don't have a internet connection at my condo yet. It getting installed on the 7th. See You Then.

Saturday, October 27, 2007

New ATI fglrx Driver 8.42

I, like many of you, was really excited that ATI released a new driver that allowed AIGLX support. AIGLX allows you to run Beryl, Compiz or Compiz-Fusion without XGL. Intel and NVIDEA users have been able to do this for over a year. I have an EVGA 7600GT in my desktop and AIGLX is a pleasure to run. Unfortunately, the driver came out too late to be included as the default ATI driver in Ubuntu 7.10 Gutsy Gibbon. You can compile the driver yourself.

I couldn't get the 8.42 driver to work for me after multiple attempts. I was willing to keep on trying until I get this e-mail from a reader named Christopher:

"hibernate/suspend does not work with the new 8.42.3 ati driver. Andfor anyone reading this, i've installed the new driver and though it isa great step forward, i'd stick with the xgl setup in gutsy. The newdriver does eliminate the need for xgl, but its much slower, and notworth it. I eventually took it out, and reverted back to the old setup,trust me its dog slow, you dont want it just yet. Give these guysanother 6 months and maybe well have a decent ati driver by then."

I think I'm going to use the repo ATI driver this release. XGL isn't pretty, but it's relatively fast and does work. I'd love to hear if any of you got the 8.42 driver working and any impressions you have regarding it's performance. For now, I'm going to use XGL for my Compiz-Fusion needs.

edited by pHreaksYcle

Wednesday, October 17, 2007

Upgrade or Fresh Install?

People have been asking me whether or not they should upgrade their Feisty installs or do a completely new install for Gutsy. My answer is that you should install Gutsy fresh. There are 3 main reasons for doing this:

1. You don't have to worry about 3rd Party Repositories. If you have Wine, Skype, Opera, Mediabuntu or any other 3rd party repo installed you have to make sure they are ready for Gutsy and get updated as well. Some 3rd party repos might not be as easy to update as others.

2. If you have any Compiz-Fusion running on your Feisty install you'll have to completely uninstall it, remove the 3rd party repo you installed it from and reinstall Ubuntu-desktop and the Feisty version of Compiz. There is no way around this. If you don't do all these steps right, you are going to run into a lot of problems with Compiz-Fusion in Gutsy. All Compiz-Fusion guides for Feisty where hacky (including mine) and have potential to cause these conflicting install & dependency problems.

3. I LOVE Ubuntu, but updating it from one version to another sucks and doesn't work. I'm sure people will argue this with me, but they're full of it. Upgrading is a real pain and posses too many problems and complications to ever be a realistic choice. If you want things to work like there supposed to install it fresh. Gutsy is totally worth the work. If one thing is broken during the update you run the risk of losing your ability to actually use Ubuntu. While in Linux everything is fixable, but if you aren't comfortable with the command line you run the risk of completely hosing your system and not being able to get your data back.


Tips for Installing Gutsy
1. Have your Home folder on a different partition.
2. Back up your Home folder.
3. Back up your Home folder. (Not a typo, its so important it needs to be said twice)
edited by pHreaksYcle

Tuesday, October 16, 2007

redDEAD's Other Blog

For the last couple of months I've been writing another blog not related to Ubuntu, Linux or the Dell Inspiron 1501. It's been a nice place for me to blow off steam, post pictures and share stuff that I find funny or amusing. It's definitely NSFW, not safe for work. I curse, there is nudity, chicks dancing very seductively, drawn genitalia, racist porn stars, homage to the karate kid and a guide on not getting beat up by the police. It's not a very good blog or a terribly interesting must read, but it is a nice place to visit if you want to laugh or see the inner workings of my mind. Bookmark it, share it with friends etc. Please don't visit if you are easily offended or not old enough to buy cigarettes.

Learn a little more about redDEAD (click the picture)
blog
edited by pHreaksYcle

Monday, October 15, 2007

Suspend/Hibernate Not Working Due To ATI Driver

*Update suspend & hibernate still not working with newer ATI drivers.

From Ubuntu 7.10 Gutsy Gibbon Release Notes:

Suspend to RAM with fglrx
Attempting to suspend to RAM using the "fglrx" ATI video driver from the restricted component will hard-lock the system due to changes in the kernel's memory allocator (which will be the default in Linux 2.6.23) that have not been followed by ATI in a timely fashion; we do not have the resources to support more kernel flavours to support a single outdated driver at this point. Workarounds include remaining on Ubuntu 7.04, avoiding suspending to RAM, or using the free ATI driver. Bug #121653

Gutsy Gibbon Release Notes

Thanks Tyler & Adrian for the heads up, keep reading and thanks for contributing. I will post an update as soon as the bug gets squashed.
edited by pHreaksYcle

Tuesday, October 9, 2007

Ubuntu Now Taking Orders for Free Gutsy CDs

There are many reasons to love Ubuntu, besides being the best operating system out and being free (as in freedom) Ubuntu also will send you FREE (as in money) copies of it's releases.

This morning I woke up and discovered that Ubuntu is taking pre-orders for its upcoming Ubuntu 7.10 Gutsy Gibbon release.

shipit


By going to Ubuntu's ShipIt website You can order your copies of the PC Edition or 64-bit PC Edition. Ubuntu can ship you multiple CDs but the default is two discs. Good thing is you can mix and match between the two. I picked up one PC and one 64 bit. I might actually try the 64 bit again. Allow 4-6 weeks for delivery.
edited by pHreaksYcle

Saturday, October 6, 2007

Wireless in Ubuntu 7.10 Gutsy Gibbon

Wireless for the Dell Inspiron 1501 now works out of the box in Gutsy Gibbon. It's a simple graphical install that requires four clicks of a mouse. The Ubuntu Restricted Driver Manager does all the work for you. After installing Ubuntu 7.10 you need to run the Restricted Driver Manager; you can find it in System>Administration>Restricted Driver Manager.

*Quick note if you update your install of Gutsy and wifi no longer works, it's a simple matter of running the Restricted Driver Manager over again.

You will see this:
restricted_driver

Next you just need to click on the enable box. Then you will see this:
broadcom_splash

Simply click on the Enable Firmware button. The Restricted Driver Manager will now ask you to Specify Firmware Location:
driver_selection

You now have two choices.
1.- To use a local file for the firmware or to download it from the internet. Using a local file doesn't require you to connect an ethernet cable to the your Dell 1501 but you will have to download a file before installing Gutsy.
2. - Downloading from the internet requires you to connect an ethernet cable to the your Dell 1501 to establish an internet connection before you can download the firmware.

To use a local file you have to download the firmware for the Broadcom 43xx chipset family, before you install Ubuntu Gutsy Gibbon. You can find the driver here Click the OK button and WiFi works.

If you can plug an ethernet cable into your Dell 1501 you can simply choose download from internet. Click the OK button and WiFi works.

Ubuntu Gutsy Gibbon makes setting up WiFi a much simpler process then Edgy & Feisty, you no longer need to downloading debs from untrusted sites or set up ndiswrapper. It's four clicks of a mouse button. Dell 1501 owners can now rejoice, it's impossible to screw up the wifi setup.
edited by pHreaksYcle

Last.fm & Ubuntu

What it is?
Last.fm is the world's largest social music platform with over 20 million active users based in more than 232 countries. Using a unique music recommendation system known as "Audioscrobbler", Last.fm builds a detailed profile of each user's musical taste by recording details of all the songs the user listens to, either on the streamed radio stations or on the user's computer or portable music device. This information is transferred to Last.fm's database ("Scrobbled") via a plug-in installed into the users' music player. The profile data is displayed on a personal web page. The site offers numerous social networking features and can recommend and play artists similar to the user's favourites.

Users can create custom radio stations and playlists from any of the audio tracks in Last.fm's music library, but are not able to listen to individual tracks on demand, or to download tracks unless the rightsholder has previously authorized it. Registration is required to acquire a profile but is not necessary to view any part of the site or to listen to radio stations.
From Wikipedia.org

To sign up to get a Last.fm Profile

How to integrate Last.fm into your jukebox in Linux
In Amarok you just need to go to the Settings>Configure Amarok and then scroll down to the last.fm icon.
lastfm

In Rhythmbox, go to Edit>Plugins then select the Last.fm Plugin.
rhythbox_lastfm

Last.fm Player

lastfm_player
The player allows the user to enter the name of any artist or tag which then gives a choice of a number of similar artist stations, or similar global tag stations. Alternatively, Recommendation radio or any of the user's personal radio stations may be played without the necessity to visit the website.

The player displays the name of the station and track currently playing, the song artist, title and track length as well as album details, the artist's photo and biographical details, album cover art when available, lists of similar artists and the most popular tags and top fans. There are several buttons, allowing the user to love, skip, or ban a song. The love button adds the song to the user's loved tracks playlist; the ban button ensures that the song will not be played again. Both features affect the user's profile. The skip button does not. Other buttons allow the user to tag or recommend the currently playing track. Other features offered by the application are: minor editing of the user's profile including removing recently played artists and songs from the loved, banned, or previously played track lists; lists of friends and neighbours, lists of tags and a list of previously played radio stations. Users can also open their full Last.fm profile page directly from the player.
From Wikipedia.org

To get the Last.fm Player:
sudo apt-get install lastfm

This is basically the only radio I listen to anymore. I enter an artist I like and it makes great recommendations. I have found a lot of new music through Last.fm

You can find me on Last.fm here.

Thursday, October 4, 2007

Excessive hardrive activity in Gutsy Beta???

Some people have been emailing and instant messaging me about excessive hard drive activity on their Dell Inspiron 1501 with Gutsy, even after disabling "Tracker" and having nothing running in the background. The problem is described as a weird hard drive noise every few seconds while the HD light goes on. They are reporting that this does not happen with their Windows XP and Vista Partitions.

I am not getting any weird noises or excess hard drive activity from my 1501. I'm guessing that it can either be from the problem being isolated to a small subsection of users, or the fact that I upgraded my hard drive a while ago, so I cannot really be of much help.

If anyone is getting weird noises or excessive hard drive activity with Gutsy on their 1501, leave a comment.
edited by pHreaksYcle

Sunday, September 30, 2007

Ubuntu 7.10 Gutsy Gibbon Beta Overview

A quick note from redDEAD:
This is an outdated article, please refer to my new overview of Ubuntu 7.10 Gusty Gibbon. This article talks only about the Beta and is missing a bunch of updates, the new article covers everything you'll need to know and do to get Ubuntu 7.10 running on your Dell Inspiron 1501.

-----

I installed the beta of Gutsy Gibbon today, so far I'm in love.

Installation:
The LiveCD doesn't load correctly. To install Gutsy you need to load Start Ubuntu in Safe Graphic Mode at the LiveCD splash screen. From there you just need to install normally.
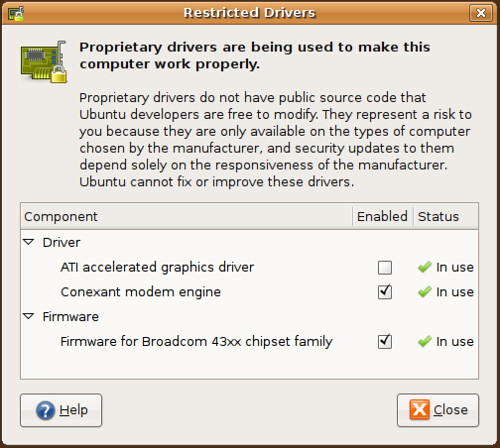
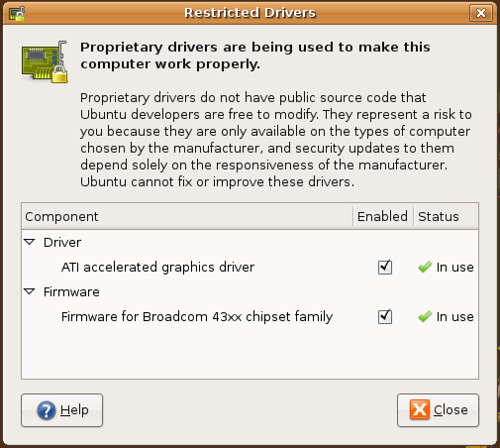
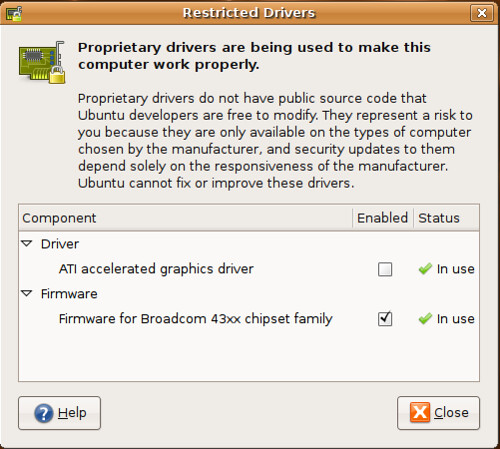
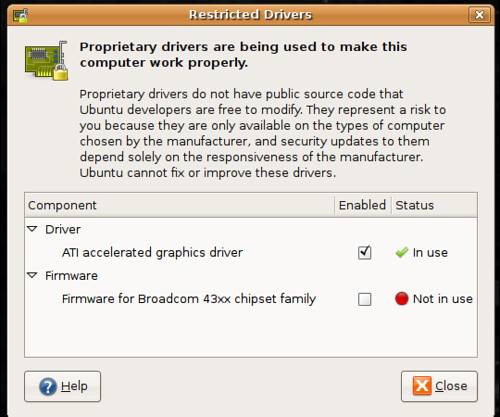
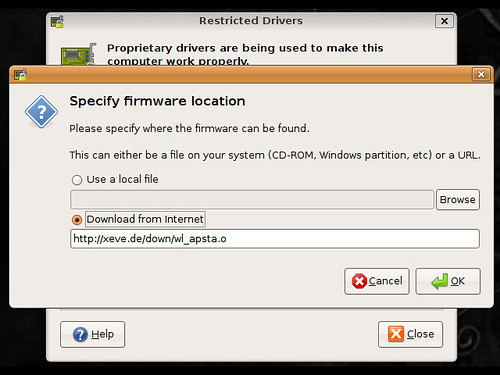
Wi-Fi:
Works out of the box. Once you sudo apt-get update Gutsy, the Restricted Manager (System>Administration) can install the the firmware for the Broadcom 43xx card in the Dell 1501. Once it downloads the deb, just select the grab the firmware from the web option and in four clicks wi-fi works.

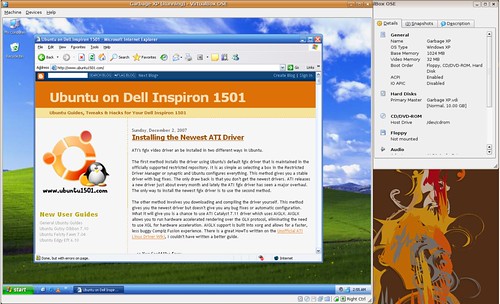
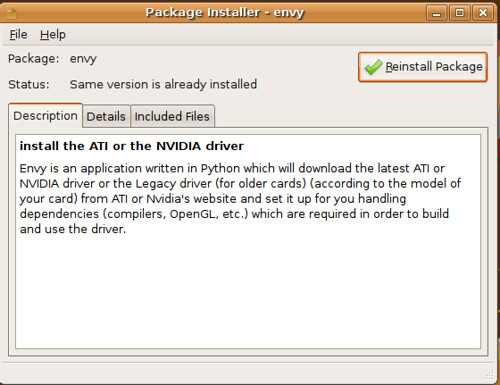
ATI Proprietary Driver:
ATI's 8.37.6 fglrx driver is automatically installed, configured and 3D enabled with the Restricted Driver Manager (System>Administration). It's Faster and more responsive than the Feisty's 8.34.8 fglrx driver. Compiz-Fusion is running really well.
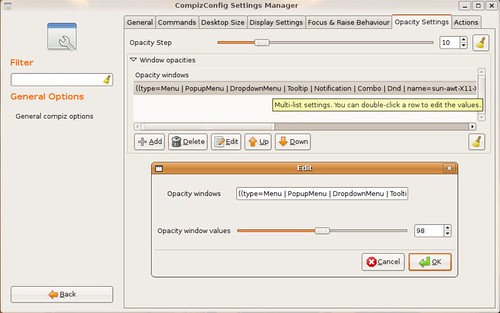
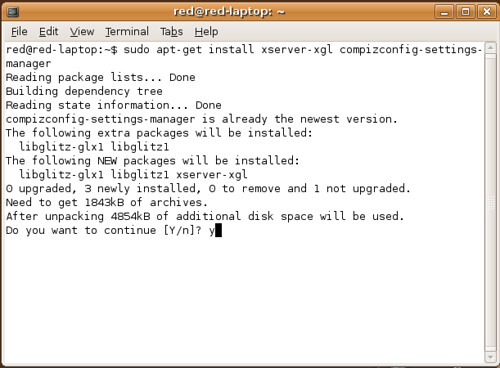
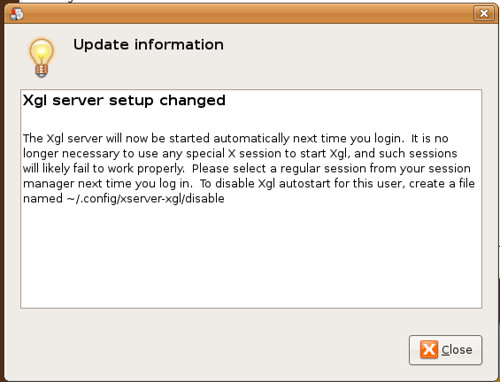
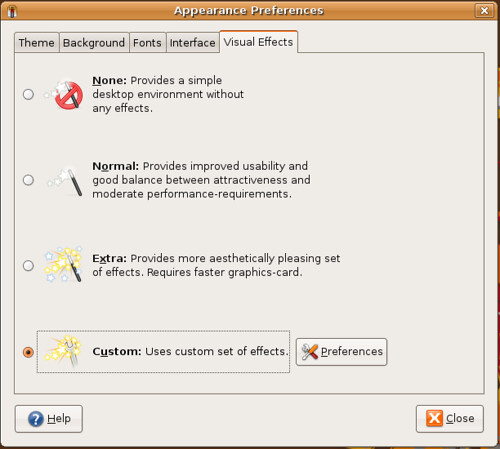
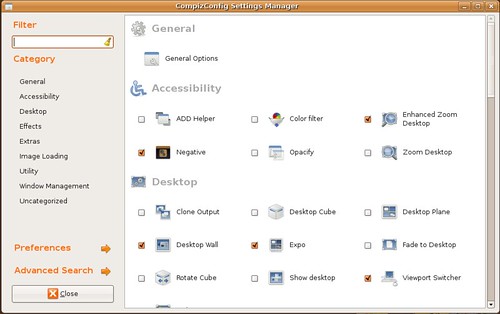
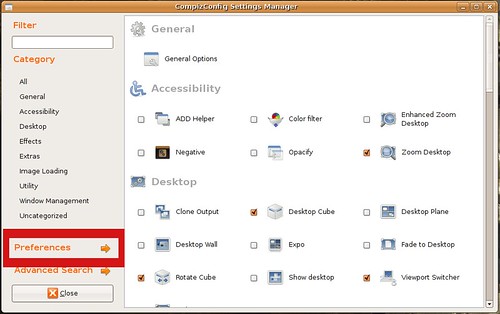
Compiz-Fusion:
Easiest Compiz install ever. Compiz-Fusion is enabled by default, so all you have to do is sudo apt-get install xserver-xgl compizconfig-settings-manager and Gutsy will configure and setup your Xgl session. Log out and back in and run Compiz-Fusion (compiz --replace) and your desktop effects work. To configure Compiz's options run ccsm.

Media Codecs
Gutsy like Feisty makes codec installation easy, no more automatix or struggling with adding repos. mp3, DVD, avi, aac, mpeg, wmv, asf, mov, flv, mp4, flash codecs are installed when you try to play them. The only thing not enabled is reading encrypted DVDs. For an easy codec install just sudo apt-get install gstreamer0.10-plugins-ugly-multiverse gstreamer0.10-plugins-bad-multiverse gstreamer0.10-plugins-bad gstreamer0.10-plugins-ugly gstreamer0.10-ffmpeg libxine1-ffmpeg libdvdread3

Ethernet:
Works out of the box.

Card Reader:

Works out of the box.

Brightness & Volume:
Works out of the box, so far I've only been able to confirm this with the 1.7 BIOS.

Video Out:
Works out of the box, Gutsy's Screens and Resolutions (System>Administration) makes using multiple monitors a breeze. Configuration doesn't require editing your xorg.conf file.

Suspend & Hibernate:
Doesn't work, my gut is telling me it has to do with a restarting the xserver at login error Feisty also had. I discussed the solution here. Hopefully one of us will figure it out. It is either a matter of finding out how to restart the xserver at login or a BIOS issue. I'm BIOS 1.7, let me know if you get different results with different BIOS version.
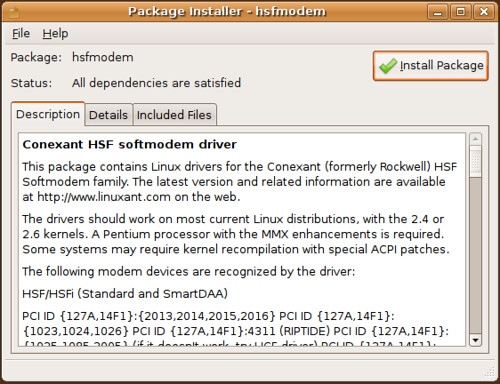
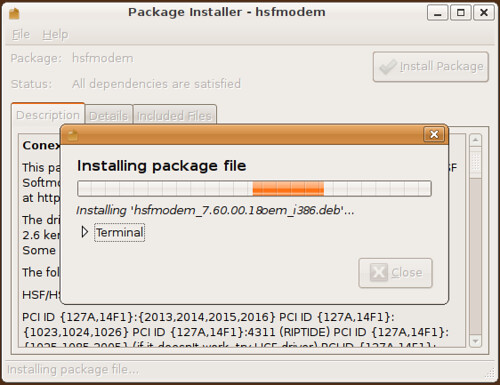
Modem:
Doesn't work, Dell's driver isn't compatible with Gutsy's kernel. Dell is readying it's fixes for Gutsy. Modem deb should be out when Gutsy hits or shortly after.

Overall Ubuntu 7.10 Gutsy Gibbon looks like a great step in the right direction for Dell Inspiron 1501 users. Setup and execution is n00b friendly and extremely easy. I highly recommend you check it out and even recommend installing it. You can find the iso HERE
edited by pHreaksYcle

Thursday, September 27, 2007

Problem with the Ubuntu 7.10 Gutsy Gibbon Beta

SOLVED!
To install the Gutsy beta on the Dell 1501, select the Start Ubuntu in Safe Graphic Mode. Once in you just have to install Gutsy normally and when you restart everything works perfectly. Problem solved.

First thing I did when I walked into the door today was download the Gutsy beta. Popped it into my Dell Inspiron 1501 and was treated to a really nice login screen. Unfortunately the login screen is as far as I got. The five Gutsy alphas didn't load on the Dell 1501 either. Looks like 1501 owners are going to have to wait a bit to enjoy Ubuntu 7.10

As soon as I figure/find out what's going on I'm gonna blog about it. There is a bug report for the alphas but its not very descriptive besides the fact that it doesn't work.

I received an error about Nautilus (Gnome's file manager) not loading. I'm going to test the beta CD this weekend and post anything I find on launchpad and here.

Sorry to be the bearer of bad news.
edited by pHreaksYcle

Wednesday, September 26, 2007

Does Anyone Use the Microphone?

Sergio de la Cruz asked:
"My microphone does not work. I don't know why. Some people here tells that it works OK. Can you guide me to the proper audio configuration for it to work?"

Can anyone out there tell me if their microphone works and if they had to do anything special to get it working? I left my 1501 in the office and I'm lazy. Thanks!
edited by pHreaksYcle

Sunday, September 16, 2007

Using Your Apple iPod in Ubuntu

This guide works with all iPods models except iPod classics, iPod Video Nano and iPod Touch. Apple has updated it's cryptographic "checksum" in their song databases for these models. This means third-party applications are no longer able to sync your music, video & pictures to these devices. The good news is that the older iPods are fully compatible with 3rd party applications.

I love my iPod and I love Ubuntu so these guides are definitely a labor of love for me. I find that the iPod works great in Ubuntu. I use 3 programs in Ubuntu for syncing my iPod; gtkpod, GPixPod and Amarok.

gtkpod
gtkpod is a platform independent Graphical User Interface for Apple's iPod using GTK2. It supports the first to fifth Generation including the iPod mini, iPod Photo, iPod Shuffle, iPod nano, and iPod Video. It allows you to sync you iPod in Linux. Some of it's features include importing the existing contents of your iPod including play counts, ratings and on-the-go playlists, adding MP3, WAV, M4A, M4B, podcasts, and video files to your iPod and allowing you to view, add and modify cover art and playlists.


To get gtkpod
in a terminal type:
sudo apt-get install gtkpod-aac

GPixPod
GPixPod is a new PyGTK application to organize photos and photo albums on your photo capable iPod models. Its approach to modify manually the elements in the Photo Database of your iPod could be also more useful than the syncing-only method of iTunes. For Linux users gpixpod is an excellent complement to gtkpod and amarok. While these two programs do an excellent job of syncing music, album art and video to your iPod neither do pictures and I haven't been able to find another program in Linux/Ubuntu that does all four; music, video, album art and pictures.

To get gpixpod
In a terminal type:
sudo apt-get install gpixpod

Amarok
Amarok a fantasic music player for Linux and Unix with an intuitive interface. Amarok not only makes playing the music you love easy, but also allows you to organize a library of music into folders according to genre, artist, and album, edit tags attached to most music formats, associate album art, attach lyrics, and automatically "score" music as you play it. It is seen as Linux's major iTunes alternative and in many people's opinions an iTunes killer. It allows you to look up album via Amazon, sync music, podcasts and audiobooks. Amarok does not do video or pictures, but it's such an amazing jukebox that I don't mind using other apps to take care of it's shortcomings.

To get Amarok, ipod support and mp3 support
In a terminal type:
sudo apt-get install amarok ipodslave libxine1-ffmpeg
edited by pHreaksYcle

Wednesday, September 5, 2007

AMD/ATI to Open Source Video Drivers

Source: From Christopher Blizzard's Blog: Invisible Sandwich

AMD, ATI's parent company, has been promising better video driver support for the Linux community for the past year. While driver updates have been monthly and the ATI's fglx driver has gotten much better, development still has been slow, closed and proprietary. AMD has now decided to open source their drivers and has promised the these two things:
  • To develop of a fully functional 2D and 3D driver that supports all of their newer radeon chipsets. This will be done in full collaboration with the open source community and will have the direct participation of hackers from companies like Red Hat and Novell.
  • To release documentation that anyone can use to build and support drivers for their chips.
This means that not only will Red Hat & Novell hackers be able to work on the driver, but anybody will be able to contribute to the code. Once the drivers do go open source, we should see vast improvements quickly.
edited by pHreaksYcle

Running uTorrent in Ubuntu

Make sure you have Wine installed before you try to run uTorrent.

To install Wine:
Add Wine's repositories to your source list:
sudo wget http://wine.budgetdedicated.com/apt/sources.list.d/feisty.list -O /etc/apt/sources.list.d/winehq.list

Add the repository key:
wget -q http://wine.budgetdedicated.com/apt/387EE263.gpg -O- | sudo apt-key add -

Update apt-get:
sudo apt-get update

Install Wine:
sudo apt-get install wine


Download uTorrent
wget http://download.utorrent.com/1.7.2/utorrent.exe

Make uTorrent hidden
mv utorrent.exe .utorrent

To launch uTorrent use the command
wine ~/.utorrent

To get firefox to automatically open uTorrent when clicking on torrent links

sudo gedit /usr/bin/utorrent

Paste the following into the newly opened text file:
#!/bin/sh

cd ~/

if [ "$1" != "" ]; then
var="`echo $1 | sed 's/\//\\\/g'`"
var="Z:${var}"
wine .utorrent "$var"
else
wine .utorrent
fi
save it & close

Make the script you just wrote executable
sudo chmod a+x /usr/bin/utorrent

Now, go into Firefox and download a torrent. Choose "open with" and hit "browse" on the list, and navigate to /usr/bin and choose uTorrent.

To learn a little more about what bittorrenting is, how it works or where to find torrents; check out my guide here
edited by pHreaksYcle

Make Your Own Papercraft Tux

make_a_tux
Source: http://www.pricoinsa.es/

Download the pattern here

If you want to make a little tux companion for your Dell 1501. It's as easy as printing out on heavier paper, cutting and gluing. Send me your pics!
edited by pHreaksYcle

Friday, August 31, 2007

KDE The Other Blue Meat

I never talk about the other major Ubuntu distro, Kubuntu. I wish I had the time to cover Kubuntu, but I don't. The good thing is that just just because I run Ubuntu doesn't mean I can't use some of Kubuntu's best applications.

Kubuntu is an official derivative of the Ubuntu operating system using the KDE environment instead of GNOME. KDE enviroment is quite similair and has advantages and disadvantages over GNOME. I will not get into specifics here but I can attest that the following KDE applications I will be recommending are fantastic and many of you might like them more than the GNOME equivalents.

Amarok

Best music jukebox for any operating system. Amarok serves many functions rather than just playing music files. For example, Amarok can be used to organize a library of music into folders according to genre, artist, and album, can edit tags attached to most music formats, associate album art, attach lyrics, and automatically "score" music as you play it. But even under an environment like GNOME Amarok retains all of its functionality. It's biggest features is it last.fm integration, media player support, cover manager and ability to synch the ipod and use many of each features.

To download Amarok, ipod support and mp3 support
sudo apt-get install amarok ipodslave libxine1-ffmpeg

K3b
Provides a graphical user interface to perform most CD/DVD burning tasks like creating an Audio CD from a set of audio files or copying a CD/DVD, as well as more advanced tasks such as burning eMoviX CD/DVDs. It can also perform direct disc-to-disc copies. The program has many default settings which can be customized by more experienced users. The actual disc recording in K3b is done by the command line utilities cdrecord or wodim, cdrdao, and growisofs. As of version 1.0, K3b features a built-in DVD ripper.

sudo apt-get install k3b
sudo apt-get install libk3b2-mp3 for mp3 decoder plugin (allows you to burn mp3s to CD)

K9copy
It is generally seen as the Linux equivalent of the Windows-based DVD Shrink, as it shrinks a DVD-9 DVD down to a DVD-5 DVD, allowing for movies on dual layer DVDs to be shrunk down in order to fit on a single layer DVD. The program allows the user to have the shrunken down DVD written to the hard drive as an ISO image which can then be burned to a DVD recordable by using a CD/DVD burning program such as K3b. Like DVD Shrink, k9copy is also useful for circumventing copy protection that normally leads to an "input/output error".


sudo apt-get install k9copy

KControl
KControl is the graphic tweaking system for the KDE enviroment. It has a modular architecture, the window is split into two parts: the left side displays the list of available modules (also known as applets), and the right side displays the current module. Applications can install their own KControl modules (an example being Konqueror), although most applications prefer to use their own, independent settings managers. This means you can use kcontrol to tweak the look and feel of these kde based programs to fit better into your ubuntu/gnome enviroment.

sudo apt-get install kcontrol
edited by pHreaksYcle

Thursday, August 23, 2007

Compiz Fusion Upgrade Problems (Trevino's Repo)

A couple people have approached me about Compiz Fusion not working 100% after updating when using my Compiz Fusion in Feisty with Xgl guide and more specifically when using Trevino's Repository. Good news is that the updates are not broken, Compiz Fusion just needs to be reset. If you are experience problems with transparent cube or 3D windows simply launch CompizConfig Settings Manager.

If you don't know where to find CompizConfig Settings Manager (System>Preferences) or don't have an entry in your menu you can launch it by firing up a terminal and typing in: ccsm

Select the preference option (in red)
ccsm

Select the Reset to Defaults option (in red)
profile

Now Compiz Fusion will reset and everything will work again. You may have to reconfigure you settings again.

If you wonder how my setup looks you can download my compiz-fusion setting profile here.
edited by pHreaksYcle

Saturday, August 18, 2007

iPod in Ubuntu Main Page

What You'll need to get started

Howto Convert Videos for Your iPod

Using gtkpod with your iPod Coming Soon

Using Amarok with your iPod Coming Soon

Using GPixPod with your iPod Coming Soon

F.A.Q. Coming Soon
edited by pHreaksYcle

Wednesday, August 15, 2007

Codec Cheatsheet

redDEAD's version of Automatix
This simple howto installs the most common restricted codecs. Allowing you to play mp3, aac, DVD, mp4, avi, wmv and many more formats & rip mp3 using the lame encoder.

For Ubuntu 7.04 Feisty Fawn
in a terminal type:
sudo apt-get install gstreamer0.10-plugins-ugly-multiverse gstreamer0.10-plugins-bad-multiverse gstreamer0.10-plugins-bad gstreamer0.10-plugins-ugly gstreamer0.10-ffmpeg libxine1-ffmpeg gstreamer0.8-lame gstreamer0.8-faac gstreamer0.8-faad libdvdread3 libk3b2-mp3

To play encrypted DVDs you need libdvdcss2. You need to install the Medibuntu Repositories to do this. My how to can be found here

Enjoy!


For more, check out Randall Munroe site at xkcd.com/
edited by pHreaksYcle

Wednesday, August 8, 2007

Compiz Fusion in Feisty with Xgl

This is the guide everyone has been waiting for, this not only works for the Dell Inspiron 1501 but works for any computer running an ATI card using Xgl.

Check ATI Driver
In a terminal type:
fglrxinfo

You should see this output in your terminal window:
display: :0.0 screen: 0
OpenGL vendor string: ATI Technologies Inc.
OpenGL renderer string: RADEON XPRESS Series
OpenGL version string: 2.0.6334 (8.34.8)

If you get something different make sure you enable the proprietary ATI driver via the Restricted Driver Manager. You can find it in the top left menu bar under S
ystem>Administration>Restricted Drivers.
(This is what you get when using the Dell Inspiron 1501, other users can check for enabled 3D by using the command
glxgears, you should see spinning gears)

Install Xgl

In a terminal type:
sudo apt-get install xserver-xgl

Setting Up XGL
In a terminal type:
sudo gedit /usr/local/bin/startxgl.sh

and this to the file:
#!/bin/sh
Xgl :1 -fullscreen -ac -accel xv:pbuffer -accel glx:pbuffer &
DISPLAY=:1
cookie="$(xauth -i nextract - :0 | cut -d ' ' -f 9)"
xauth -i add :1 . "$cookie"
exec dbus-launch --exit-with-session gnome-session
save and close file

Then make the xgl script executable by entering this into a terminal:
sudo chmod a+x /usr/local/bin/startxgl.sh

Creating a XGL Login

Make the script, by typing this into a terminal:
sudo gedit /usr/share/xsessions/xgl.desktop

add this text to the file:
[Desktop Entry]
Encoding=UTF-8
Name=Xgl
Comment=Start an Xgl Session
Exec=/usr/local/bin/startxgl.sh
Icon=
Type=Application
save and close file

Remove Compiz & Desktop Effects
sudo apt-get remove compiz-core desktop-effects

If you have Beryl Installed Remove Beryl Too
In a terminal type:
sudo apt-get remove beryl-ubuntu beryl-manager emerald

If you want to use emerald as your decorator for Compiz Fusion do not remove the emerald package.

Add the Compiz Fusion Repository

In a terminal type:
sudo gedit /etc/apt/sources.list

Add this to the end of your your source list:
deb http://download.tuxfamily.org/3v1deb feisty eyecandy
deb-src http://download.tuxfamily.org/3v1deb feisty eyecandy
save and close file

Add the tuxfamily Repository Key
In a terminal type:
sudo wget http://download.tuxfamily.org/3v1deb/DD800CD9.gpg -O- | sudo apt-key add -

Update Your System
In a terminal type:
sudo apt-get update

Install Compiz Fusion

In a terminal type:
sudo apt-get install compiz compizconfig-settings-manager compiz-plugins compiz-gnome compiz-fusion-plugins-extra compiz-fusion-plugins-unofficial libcompizconfig-backend-gconf

Now you just have to log off, log into your Xgl session and run Compiz Fusion.

To run Compiz Fusion:
compiz --replace

To run the Compiz Setting Manager:
ccsm

I find Compiz Fusion to be faster and more responsive then Beryl. I don't use Beryl's window manger, Emerald. If you want to use Emerald with Compiz Fusion, it's as easy as sudo apt-get emerald and to launch it's emerald --replace. I didn't mention it in my guide because I prefer Compiz's gtk-window-decorator, and don't want to put up with the hassle of people asking my questions about software I don't use.

Troubleshooting

Q: Compiz Fusion doesn't load/work?
A: Make sure you are you logged onto your Xgl session. Select it at startup from sessions.

Q: I don't have windows decorations.
A: Did you run ccsm (compiz setting manager) and enable Window Decorations

Q: I don't have a cube.
A: Did you run ccsm (compiz setting manager) and enable 3D cube

Q: I get error: E: Couldn't find package ******, can you help?
A: You have to add the repository correctly and then update it. Do those steps over again.

Q: How do I get Compiz Fusion to load when I log in?
A: You have to add compiz --replace to your startup session. First, go to System>Preferences>Session. Then click on the New button on the right hand side of the menu. Add compiz --replace to your startup.

Hope you guys like the guide.
redDEADresolve
edited by pHreaksYcle