EDIT: SEE THE BOTTOM FOR NEW WAY TO FORWARD PORTS EASIER!
This article is not operating system specific. Bittorrenting works the same on Windows, Mac or Linux. It's for my buddy Luke. Sorry it took a couple of days.
I work and go to school so I never have time to watch some of my favorite shows. The good thing is there are nice people who record my favorite shows and upload them to the internet for everyone. Usually a couple of hours after the show airs, it's waiting online. It is surprisingly simple to "bittorrent".
WHAT IS BITTORRENT
BitTorrent is a peer-to-peer (P2P) file distribution protocol. It is capable of preparing, requesting, and transmitting any type of computer file over a network, using the protocol. A person first creates a "torrent." This is a small file which contains metadata about the files to be shared, and about the tracker, the computer that coordinates the file distribution. Peers that want to download the file first obtain a torrent file for it, and connect to the specified tracker which tells them from which other peers to download the pieces of the file. So, in a nutshell, it's a set of guidelines various programs use to share data large and small with others.
HOW TO GET BITTORRENT
Now the first thing we need is a bittorrent “client.” A disclaimer here: you should NEVER pay for a client or torrent. Sites that charge you are fakes and probably want to install junk on your PC. A client is a program that allows us to use the bittorrent protocol. The Offical Bittorrent Client is a great start, it works, it is easy to understand and is compatible across all operating systems. Azureus is another cross platform client that offers a ton of features and options that makes it the best option for those who have a newer computer and a extra RAM. The final program is uTorrent, it's a Windows only program that has been getting a ton of buzz in the bittorrenting community. It runs fast, has lots of options, and doesn't take up a lot of computer resources. Hence the name micro torrent. Remember, if you are an Ubuntu user, the official bittorrent client is already installed and you can get Azureus through Synaptic package manager. Remember that you have to have Java installed for any operating system to use Azureus.
Once you pick a client and have downloaded, installed and configured it, the hardest things to get right are Port Forwarding and NAT. These are the only two issues that you need to remedy if you you are using a firewall or router to get the fastest download speeds. I won't get into them because both wikis I linked to do a much better job then I ever could. Port forwarding can also be done by following the guides (including pictures!) for your specific router on www.portforward.com. Now you are ready to download some tv shows, music, movies, comic books, ebooks, audio books, programs, games and everything else under the sun.
WHERE TO FIND TORRENTS
To download files you need to find torrents. These are the small files that tell you who has what and how to redistribute it. There are tons of sites out there but these are some of the best:
The Pirate Bay
Mininova
iso Hunt
Scrape Torrent Searches the above sites.
Once you're on a torrent site, you just type what you are looking for in a search box and download your torrent. Once you open it with the appropriate bittorrent program, you're all set and your torrent should begin to download.
A COUPLE OF TIPS
- Download SMART, not everyone who creates a torrent is a nice person. (especially if you're using Windows)
- It is illegal to bittorrent something that is copyrighted, especially when you don't have the creators authorization.
- There are plenty of legal torrents out there so not all bittorrentors are pirates, some are ninjas.
- If you want to download video/audio your file should end in the extension .avi, .dixv, .mpg, .mp4, .mov, .mp3, .wav, .aac, or .flac NOT .exe. This .exe is an executable and you'll end up with junk (or worse) installed on your PC.
- Never trust any torrented program. You don't know what's inside of it. You take a risk to the security of your PC when you install stolen programs from unknown sources.

Saturday, January 27, 2007
Tuesday, January 23, 2007
Beryl with XGL on DELL 1501 (For Edgy Eft)
This guide is going to show you how to install Beryl using Compiz's gtk window manager. Beryl allows you to change managers on the fly so you can install both, use Compiz, or Beryl's Emerald window manager or switch at your leisure. If you don't want to install Compiz's gtk window manager skip all Compiz steps. Beryl will install properly either way.
Beryl's 2.0 release is impressive, it runs extremely well on the Dell Inspiron 1501. This guide is straight forward and easy. Don't be afraid, remember blue text is what you put into your terminal window, red text is import information that you should pay extra attention to.
Install the ATI Proprietary Driver:
Using The Unofficial Linux ATI Driver guide
gpg --keyserver hkp://wwwkeys.eu.pgp.net --recv-keys 0x483170E9 ; gpg --export -a 0x483170E9 | sudo apt-key add -
Update your repositories.
sudo apt-get update
Name=Xgl
Comment=Start an Xgl Session
Exec=/usr/local/bin/startxgl.sh
Icon=
Type=Application
now please SAVE IT, and do not add this line only the blue text.
Beryl's 2.0 release is impressive, it runs extremely well on the Dell Inspiron 1501. This guide is straight forward and easy. Don't be afraid, remember blue text is what you put into your terminal window, red text is import information that you should pay extra attention to.
Install the ATI Proprietary Driver:
Using The Unofficial Linux ATI Driver guide
This is the most important step, without doing this right you can't run Beryl. Installing your ATI driver is easy, follow the guide and you won't go wrong. Use Method 2
Now, check to see if you installed the driver right!
fglrxinfo
You should see this ouputed on your terminal window:
display: :0.0 screen: 0
OpenGL vendor string: ATI Technologies Inc.
OpenGL renderer string: RADEON XPRESS Series
OpenGL version string: 2.0.6334 (8.34.8)
Now test this:
fgl_glxgears
if you see these gears spinning you know you did it right and you've enabled 3D.
Setting Up Beryl & Compiz Repositories:
Add the Beryl & Compiz repositories to your source list, this will bring up your source list.
sudo gedit /etc/apt/sources.list
The you will add the line to the bottom of your source list for Beryl:
deb http://ubuntu.beryl-project.org/ edgy main
And add this line for to the bottom of your source list below Beryl's:
deb http://gandalfn.club.fr/ubuntu edgy dev
Now you have to add the key so you can download from the Beryl Repo:
wget http://ubuntu.beryl-project.org/root@lupine.me.uk.gpg -O- | sudo apt-key add -
gpg --keyserver hkp://wwwkeys.eu.pgp.net --recv-keys 0x483170E9 ; gpg --export -a 0x483170E9 | sudo apt-key add -
Update your repositories.
sudo apt-get update
You are now able to download from the Beryl and Compiz repos
Setting Up XGL:
Download your xserver-xgl: (can't run an xgl session without it)
sudo apt-get install xserver-xgl
Adding an XGL login session:
Do this by creating this script:
sudo gedit /usr/local/bin/startxgl.sh
and this to the file:
#!/bin/sh
Xgl -fullscreen :1 -ac -br -accel glx:pbuffer -accel xv:pbuffer &
sleep 4
export DISPLAY=:1
cookie="$(xauth -i nextract - :0 | cut -d ' ' -f 9)"
xauth -i add :1 . "$cookie"
exec gnome-session
now please SAVE IT, and do not add this line only the blue text.
Then make it executable:
sudo chmod a+x /usr/local/bin/startxgl.sh
Creating a XGL Login:
Make the script.
gedit /usr/share/xsessions/xgl.desktop
add this to the file:
[Desktop Entry]
Name=Xgl
Comment=Start an Xgl Session
Exec=/usr/local/bin/startxgl.sh
Icon=
Type=Application
now please SAVE IT, and do not add this line only the blue text.
Install Compiz Window Manger:
sudo apt-get install compiz-core compiz-gnome
Install Beryl:
sudo apt-get install beryl emerald-themes
Now You are technically done, but you have to login into your XGL session before you can run Beryl. On the Ubuntu login screen choose sessions and then choose XGL.
To use Compiz Window manager which allows you to use any gtk theme as your window skin, including Ubuntu own gtk human theme. Simple run Beryl Manager from Applications>System Tools>.
Then right click the red emerald>Select Window Decorator>GTK Window Decorator. Now you can use your gtk theme with Beryl.
Saturday, January 20, 2007
To Maria & Others Having Issues
The only answers I have for you is to install Ubuntu 6.10 edgy Eft the way described in my guide. It does work for all models of the Dell 1501. I've proof read my guide and others have used it without an issue. Follow the steps. You don't need "noapic" to load up edgy. Edgy loads without it. All "pci=nomsi" does is allow the partitioner to find your hard drive and install Ubuntu onto it. Read my guide and make sure you follow the steps.
I truly believe in the phrase "Humanity to Others" but I don't have the necessary skills or patience to troubleshot problems. I post what I know works and how I got it to work. If you follow the guide it will work.
The place to truly find answers is the Ubuntu forums. There are experts there that are 100 times more qualified to troubleshoot. They have helped me find the answers to all my Ubuntu issues.
You can check out the forums here.
Wednesday, January 17, 2007
My Dell 1501
Filler Post Alert! Check out my desktop and laptop.
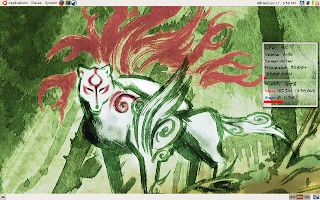
My desktop is nothing fancy. Firefox, Terminal & Amarok on the left upper bar and Sound, Date, System Monitor, WiFi strength, Trash on the upper right. On the bottom, it's my three desktops and notification area. I finally got gdesklets looking good. Point and laugh, I need to upgrade my RAM really bad. My background image is from the PS2 game Okami (made by Grasshopper Studios). You can find the RAW image here it's about 4,300x3,000 so you're gonna have to trim it.
The Linux Inside vinyl sticker is really nice and professionally done. I found it on eBay so if you like it, look it up. The Ubuntu sticker was free with my Dapper CDs.

Saturday, January 13, 2007
ATI Proprietary Driver in Ubuntu 6.10 Edgy Eft
To install the ATI Proprietary Driver, we will be using the guide from the Unofficial ATI Linux Driver Wiki. It has guides for two methods. The 1st method is the Ubuntu Way, using the Ubuntu Edgy Eft restricted repository to download the driver. The 2nd method has you download the newest driver from ATI. The newest driver is your best best. I couldn't write a better howto guide myself.
USE METHOD TWO FOR BEST RESULTS
The Unofficial ATI Linux Driver Wiki
This not only works for the Dell Inspiron 1501 but any computer running Ubuntu 6.10 with an ATI card, like the X1600 or the X1150. Enjoy.
Verifying Proper Installation
You should see this:
Next Up: Getting the Xbox360 controller working on Ubuntu or any Debian based installs. Also "should" work on the PS3 with a Debian type install. Can't test because I don't own a PS3.
USE METHOD TWO FOR BEST RESULTS
The Unofficial ATI Linux Driver Wiki
This not only works for the Dell Inspiron 1501 but any computer running Ubuntu 6.10 with an ATI card, like the X1600 or the X1150. Enjoy.
Verifying Proper Installation
fglrxinfo
red@red-laptop:~$ fglrxinfo
display: :0.0  screen: 0
OpenGL vendor string: ATI Technologies Inc.
OpenGL renderer string: RADEON XPRESS Series
OpenGL version string: 2.0.6334 (8.34.8)
Next Up: Getting the Xbox360 controller working on Ubuntu or any Debian based installs. Also "should" work on the PS3 with a Debian type install. Can't test because I don't own a PS3.
Friday, January 12, 2007
Fixing WiFi on the Dell 1501 Edgy & Feisty
The best thing you can do is read the complete guide first, then print it out and read it again. You have to do every step right.
STEP 1: CLEAN YOUR SYSTEM - You need to remove any and all versions of Ndiswrapper currently installed on your system.
In a terminal type:
sudo rmmod ndiswrapper
then:
sudo apt-get remove ndiswrapper-utils
Now you need to hunt down and find all instances of ndiswrapper left on your file system.
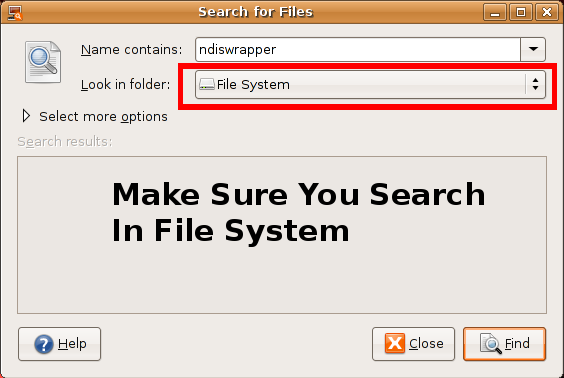
The easiest way to do this is to run a search. To find Ubuntu's search function, look under the Places entry on the top left corner of your computer. Type in ndiswrapper and look in folder : file system.
Now once you actually searched your file system to you should see results similar to the ones pictured below.
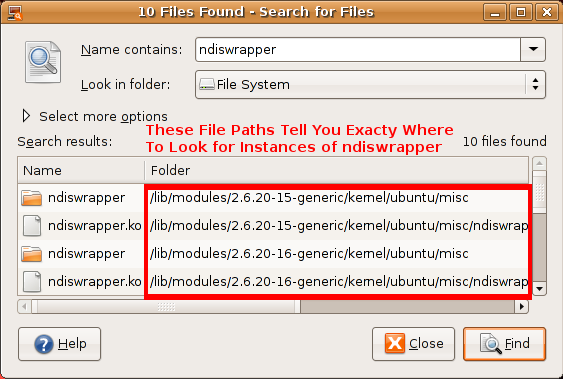
The files paths outlined by the red box tell you exactly where to look to file the old unneeded ndiswrapper files you must delete. Many of these files require you to be root (have administration access) to delete them.
To become root and look for these files you need.
In a terminal type:
sudo nautilus
You should see this:
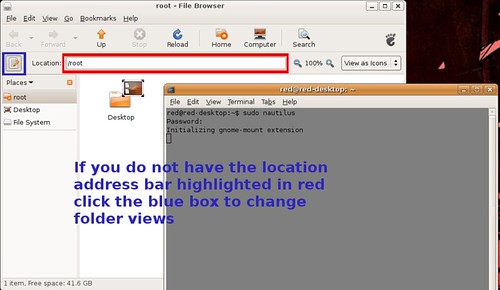
In this newly opened /root window you can search and delete all instances of ndiswrapper. Take the file pates the search function gave you and type them in to the location box highlighted in red. If you don't have the location box, click the button in highlighted in blue to change views.
Delete all instances of ndiswrapper. Then run the two previous commands over again.
In a terminal type:
sudo rmmod ndiswrapper
Then:
sudo apt-get remove ndiswrapper-utils
STEP 2: GET NEEDED PACKAGES - We'll need to install compiling tools, the latest kernel headers, and then the source code for the latest ndiswrapper, and the wireless drivers from Dell.com
Get your compiling tools & kernel headers
In a terminal type:
sudo apt-get update
sudo apt-get install build-essential
sudo apt-get install linux-headers-`uname -r`
Download Ndiswrapper
In a terminal type:
wget http://easynews.dl.sourceforge.net/sourceforge/ndiswrapper/ndiswrapper-1.47.tar.gz
If that doesn't work use this link.
Since writing this guide newer versions of ndiswrapper have been released on sourceforge. If you decide to download a newer release just change the version number to one you downloaded. If you download 1.50 instead of 1.47 you should change the command to ...ndiswrapper-1.50.tar.gz
Get the Windows driver for your Dell 1501
In a terminal type:
wget http://ftp.us.dell.com/network/R140747.EXE
Now we will make a folder store your drivers in.
In a terminal type:
mkdir ~/.drivers
Now we will move the files we downloaded, ndiswrapper & R140747.EXE (the Dell driver), to the folder we just made.
In a terminal Type:
mv ~/ndiswrapper-1.47.tar.gz ~/.drivers
Then:
mv ~/R140747.EXE ~/.drivers
Now we are going to to untar/uncompress the ndiswrapper.
In a terminal type:
cd ~/.drivers
Then:
tar -xzvf ndiswrapper-1.47.tar.gz
Finally, we need to blacklist the broken and useless bcm43xx firmware drivers that try to load in a default Ubuntu install:
In a terminal type:
sudo su
Then type:
sudo echo blacklist bcm43xx >> /etc/modprobe.d/blacklist
YOU MUST REBOOT NOW!
STEP 3: COMPILE PROGRAM - Now we'll complile the Ndiswrapper program
Point your terminal to the ndiswrapper-1.47 folder.
In a terminal type:
cd ~/.drivers/ndiswrapper-1.47
Now get everything ready for the compiling.
In a terminal type:
sudo make uninstall
Do the above command multiple times, 3 should do it. After running the command continue to the next step. You can stop when you get the message that says something about no files or directories found.
Now we compile ndiswrapper:
In a terminal type:
sudo make
Then:
sudo make install
STEP 4: INSTALL DRIVERS - Use the Windows driver with ndiswrapper to get WiFi working
In order for us to unzip the R140747.EXE driver we need to point your terminal to the /.driver folder.
In a terminal type:
cd ~/.drivers
Unzip the R140747.EXE driver
In a termianl type:
unzip -a R140747.EXE
We need to point your terminal to the DRIVER folder we just unzipped
In a terminal type:
cd ~/.drivers/DRIVER
Now install the Windows driver
In a terminal type:
sudo ndiswrapper -i bcmwl5.inf
Then:
sudo ndiswrapper -l
You should see a message that says driver present, hardware detected.
Now finish installing the driver
In a terminal type:
sudo ndiswrapper -m
Then:
sudo modprobe ndiswrapper
YOU MUST REBOOT NOW!
STEP 5: TEST WIRELESS
Your WiFi light on your laptop should be illuminated, if not you can always turn it on and off with the Fn+F2 (Function & F2 Key) and you're all set! Try running this to see if your wireless card is functioning properly.
In a terminal type:
sudo iwlist scanning
STEP 1: CLEAN YOUR SYSTEM - You need to remove any and all versions of Ndiswrapper currently installed on your system.
In a terminal type:
sudo rmmod ndiswrapper
then:
sudo apt-get remove ndiswrapper-utils
Now you need to hunt down and find all instances of ndiswrapper left on your file system.
The easiest way to do this is to run a search. To find Ubuntu's search function, look under the Places entry on the top left corner of your computer. Type in ndiswrapper and look in folder : file system.
Now once you actually searched your file system to you should see results similar to the ones pictured below.
The files paths outlined by the red box tell you exactly where to look to file the old unneeded ndiswrapper files you must delete. Many of these files require you to be root (have administration access) to delete them.
To become root and look for these files you need.
In a terminal type:
sudo nautilus
You should see this:
In this newly opened /root window you can search and delete all instances of ndiswrapper. Take the file pates the search function gave you and type them in to the location box highlighted in red. If you don't have the location box, click the button in highlighted in blue to change views.
Delete all instances of ndiswrapper. Then run the two previous commands over again.
In a terminal type:
sudo rmmod ndiswrapper
Then:
sudo apt-get remove ndiswrapper-utils
STEP 2: GET NEEDED PACKAGES - We'll need to install compiling tools, the latest kernel headers, and then the source code for the latest ndiswrapper, and the wireless drivers from Dell.com
Get your compiling tools & kernel headers
In a terminal type:
sudo apt-get update
sudo apt-get install build-essential
sudo apt-get install linux-headers-`uname -r`
Download Ndiswrapper
In a terminal type:
wget http://easynews.dl.sourceforge.net/sourceforge/ndiswrapper/ndiswrapper-1.47.tar.gz
If that doesn't work use this link.
Since writing this guide newer versions of ndiswrapper have been released on sourceforge. If you decide to download a newer release just change the version number to one you downloaded. If you download 1.50 instead of 1.47 you should change the command to ...ndiswrapper-1.50.tar.gz
Get the Windows driver for your Dell 1501
In a terminal type:
wget http://ftp.us.dell.com/network/R140747.EXE
Now we will make a folder store your drivers in.
In a terminal type:
mkdir ~/.drivers
Now we will move the files we downloaded, ndiswrapper & R140747.EXE (the Dell driver), to the folder we just made.
In a terminal Type:
mv ~/ndiswrapper-1.47.tar.gz ~/.drivers
Then:
mv ~/R140747.EXE ~/.drivers
Now we are going to to untar/uncompress the ndiswrapper.
In a terminal type:
cd ~/.drivers
Then:
tar -xzvf ndiswrapper-1.47.tar.gz
Finally, we need to blacklist the broken and useless bcm43xx firmware drivers that try to load in a default Ubuntu install:
In a terminal type:
sudo su
Then type:
sudo echo blacklist bcm43xx >> /etc/modprobe.d/blacklist
YOU MUST REBOOT NOW!
STEP 3: COMPILE PROGRAM - Now we'll complile the Ndiswrapper program
Point your terminal to the ndiswrapper-1.47 folder.
In a terminal type:
cd ~/.drivers/ndiswrapper-1.47
Now get everything ready for the compiling.
In a terminal type:
sudo make uninstall
Do the above command multiple times, 3 should do it. After running the command continue to the next step. You can stop when you get the message that says something about no files or directories found.
Now we compile ndiswrapper:
In a terminal type:
sudo make
Then:
sudo make install
STEP 4: INSTALL DRIVERS - Use the Windows driver with ndiswrapper to get WiFi working
In order for us to unzip the R140747.EXE driver we need to point your terminal to the /.driver folder.
In a terminal type:
cd ~/.drivers
Unzip the R140747.EXE driver
In a termianl type:
unzip -a R140747.EXE
We need to point your terminal to the DRIVER folder we just unzipped
In a terminal type:
cd ~/.drivers/DRIVER
Now install the Windows driver
In a terminal type:
sudo ndiswrapper -i bcmwl5.inf
Then:
sudo ndiswrapper -l
You should see a message that says driver present, hardware detected.
Now finish installing the driver
In a terminal type:
sudo ndiswrapper -m
Then:
sudo modprobe ndiswrapper
YOU MUST REBOOT NOW!
STEP 5: TEST WIRELESS
Your WiFi light on your laptop should be illuminated, if not you can always turn it on and off with the Fn+F2 (Function & F2 Key) and you're all set! Try running this to see if your wireless card is functioning properly.
In a terminal type:
sudo iwlist scanning
edited by pHreaksYcle
Sorry Chuck
Wow, I feel bad. I proof read everything before I post it and try to redo every step. I read my installation guide so many times and an error still slipped in. I think it's Microsoft's doing. This error was fixed thanks to Chuck and his bug reporting.
Please help me, I'm not a Linux guru. If something looks wrong let me know. I encourage everyone who reads this blog to HELP. This is what the open source community is about.
I am truly sorry Chuck, but I thank you for letting me know.
Please help me, I'm not a Linux guru. If something looks wrong let me know. I encourage everyone who reads this blog to HELP. This is what the open source community is about.
I am truly sorry Chuck, but I thank you for letting me know.
Thursday, January 11, 2007
Installing Ubuntu on Your Dell 1501
Ubuntu does not install on the Dell 1501 without a little work. But with a little work it can be done. The fix is adding the command pci=nomsi to grubs boot param. Follow this guide and you’ll be using Ubuntu in no time.
Getting Ubuntu Installed:
1. Changing the boot order in the BIOS.
This allows your Dell 1501 to first look to boot from the DVD drive. This is an essential step.
Place the Ubuntu Disc into your DVD drive
Reboot or turn on you 1501. When you see this screen, hit the F2 button.
This takes you to your BIOS screen.
2. You want to use the right arrow key to select Boot. Then use the down arrow key to access you DVD drive, I own the DVD-Burner and its name is ATAPI CD-ROM: HL-DT-ST DVD+/-RW-(PM) but common sense is your guiding light. I will say DVD and the 1501 only has one DVD slot.
3. Once you have your DVD drive selected, use the shift key and the +/=, right next to the backspace key (highlighted red) to change the priority order. Make sure your DVD drive is on the top. If you goof, the -/_ highlighted blue will lower a selection in the boot order.
Once done hit the F10 key to save and exit.
The computer will now boot from the DVD drive first. Restart your computer.
4. At the Ubuntu options menu (above screen) hit the F6 key to add to Ubuntu boot param. This will bring up a command line in the lower right hand part of your screen.
This is where the magic happens. Ubuntu will not be able to find your SATA hard disk without adding
pci=nomsi to the very end of this command line.
Yours should look just like the above picture. It will say …rw quiet splash – pci=nomsi. Hit the ENTER key and Ubuntu will begin to boot up. It will initially take a few minutes, be patient!
5. You will now see this screen. You can try Ubuntu out or go straight to the good stuff and install it.
Click the install icon on the upper left hand portion of the screen and follow the menus in order to setup your install.
After enter your time zone, keyboard, login name and password it will ask you if where you’d like to install Ubuntu you can choose to:
1. Erase the entire disk – (install Ubuntu on the Hard Drive and deletes everything else)
2. Manually edit the partition table – (allow you to separate the hard drive and have two or more operating systems on your computer)
Now Ubuntu should be installing. Sit back and relax it shouldn’t take more than 25 minutes. Once Ubuntu has been installed you will have to restart and repeat the steps of adding pci=nomsi to your boot param. This is the last time though, it will be permanent next time you load up Ubuntu.
6. Once Ubuntu loads you will want to make pci=nomsi permanent so go to the terminal. It’s located in ApplicationsàAccessoriesàTerminal
Enter in the code:
Sudo gedit /boot/grub/menu.lst (that’s a lower case L at the end)
Enter your password and a text file will appear.
This file is your GRUB boot file. Be careful you can screw your system up if you delete or alter the wrong item.
Look at the bottom of the file for the lineskernel /boot/vmlinux-2.16.17.10-generic root=/dev/sda1 ro quiet splash
Or a very similar variation. Look at the picture below if you are unsure but USE COMMON SENSE.
Add pci-nomsi to the end of the kernel boot line. It should look like this:
kernel /boot/vmlinux-2.16.17.10-generic root=/dev/sda1 ro quiet splash pci=nomsi
7. Save and you are done. Your computer will boot into Ubuntu every time and Installation is complete.
Next Up: WiFi, you wanna wait till I get the guide up before you try to set it up. But if you want to jump the gun use this guide.
edited by pHreaksYcle
How to get Ubuntu
Well I forgot to mention how to get Ubuntu. There are three main ways to get a copy:
1. Order free
You fill out a mailing form and Canonical will send them to you in about 6-8 weeks. No hassles, junk mail, no mailing lists, no e-mail, nothing to buy later. You just get the disks for free.
Order them here
2. Download directly from a mirror
This is the fastest way. Depending on your connection it takes a couple of hours.
Download Ubuntu here
3. Bittorrent
If you don't know what or how to use bittorent select option 1 or 2. If you want try to learn more about Bittorent go here.
The torrents to Download Ubuntu can be found at the bottom of this page
Once you have downloaded Ubuntu you need to burn it onto a disc. So either use your favorite burning program or you can use WindowsXP's built in iso burning. You just insert a blank CD/DVD into your drive, right click the .iso file you downloaded and select Send To, send it to your CD/DVD writer (for most people it will be named CD-RW Drive or DVD-RW Drive) and the disc will begin to burn.
These CD/DVDs are live discs. This mean that you can put them into your machine and try using Ubuntu before you install it. Still not sure what a LiveCD is? Look here
Next Up: Installing Ubuntu, I promise. I'm working overtime to get the guide easy and take all the pictures needed.
edited by pHreaksYcle
Why the Dell 1501?
The Dell 1501 are the newest Dell laptop and the only one to feature AMD processors. It's aimed directly at the budget laptop market and offers a lot of bang for your buck. My model only cost me US$630 and is the standard Dell baseline configuration except for the DVD burner upgrade. It's a solid PC if all you want to do is surf the net, write email, word processing and light gaming. What sold me was the integrated ATI X1150 graphic chipset. If I'm going to have to have an integrated graphics card it's going to the X1150. It's outperformed all others in it's price range.
Here are my Laptop specs:
Mobile AMD Sempron 3500+ Processor (1.8GHz/512K)
ATI Radeon Xpress 1150 256MB HyperMemory (integrated)
512 MB of 533 DDR2 RAM (1 Dimm)
60gb 5400 RPM SATA hard drive
DVD+/-RW with Dual Layer DVD+R write capacity
Dell Wireless 1390 802.11g Mini Card (54Mbps)
The only things that I plan on upgrading is the memory. 512K is NOT enough, but I was damned if I was going to pay Dell to upgrade it for me. For the price of Dell installing another 512K, you can buy a 1GB stick and install it yourself giving you 1.5BG. The 1501 runs Ubuntu extremely well, everything except WiFi work right out of the box. If you are thinking about a budget notebook for Windows, Ubuntu, or Linux in general it's a great little machine.
Next Up: Getting Ubuntu to Install
edited by pHreaksYcle
Subscribe to:
Posts (Atom)
