mini_banner

Thursday, April 24, 2008

Reconfigure Xorg File (xserver-xorg)

If you need to reconfigure your xserver-xorg file, are having issues with your monitor resolution, need to reset xorg or just plain can't get a graphical interface to load, use this command.

In a terminal type:
dpkg-reconfigure xserver-xorg

This will allow you to reconfigure your xorg settings, resolution, graphical problems etc.

edited by pHreaksYcle

Installing Wine In Hardy Heron

Wine is a software application which aims to allow Unix-like computer operating systems on the x86 architecture to execute programs that were originally written for Microsoft Windows.

There are two methods to installing Wine
1. Install Wine from Ubuntu's own repository, it is an older but officially supported version for Hardy Heron.
In a terminal type:
sudo apt-get install wine

2. Add Wine's own repository, this gives you the newest version of Wine and access to all future updates
In a terminal type:
wget -q http://wine.budgetdedicated.com/apt/387EE263.gpg -O- | sudo apt-key add -

Next, add the repository to your system's source list:
In a terminal type:
sudo wget http://wine.budgetdedicated.com/apt/sources.list.d/hardy.list -O /etc/apt/sources.list.d/winehq.list

Update Your Source List:
In a terminal type:
sudo apt-get update

Install Wine
In a terminal type:
sudo apt-get install wine

Once installed (either method) you can configure Wine by running:
winecfg

Make Wine Graphical User Interface Match Ubuntu's
Ina terminal type:
gedit ~/.wine/user.reg

Replace the [Control Panel\\Colors] section with

[Control Panel\\Colors] 1176981676
"ActiveBorder"="239 235 231"
"ActiveTitle"="203 133 61"
"AppWorkSpace"="198 198 191"
"Background"="93 77 52"
"ButtonAlternativeFace"="200 0 0"
"ButtonDkShadow"="85 85 82"
"ButtonFace"="239 235 231"
"ButtonHilight"="255 255 255"
"ButtonLight"="255 255 255"
"ButtonShadow"="198 198 191"
"ButtonText"="0 0 0"
"GradientActiveTitle"="239 235 231"
"GradientInactiveTitle"="239 235 231"
"GrayText"="198 198 191"
"Hilight"="246 200 129"
"HilightText"="0 0 0"
"InactiveBorder"="239 235 231"
"InactiveTitle"="239 235 231"
"InactiveTitleText"="255 255 255"
"InfoText"="0 0 0"
"InfoWindow"="255 255 166"
"Menu"="239 235 231"
"MenuBar"="239 235 231"
"MenuHilight"="246 200 129"
"MenuText"="0 0 0"
"Scrollbar"="239 235 231"
"TitleText"="255 255 255"
"Window"="255 255 255"
"WindowFrame"="0 0 0"
"WindowText"="0 0 0"

A Quick Screenshot:
Screenshot-Wine configuration
edited by pHreaksYcle

Monday, April 14, 2008

Stop Compiz-Fusion From Loading Automatically

This guide will show you how to stop Compiz-Fusion from loading automatically on startup in Hardy Heron and how to setup a shortcut for launching Compiz when you want.

Step 1: Run gconf-edit
Start Run Application by pressing Alt+F2

Screenshot-Run Application

Enter gconf-editor into the box, hit enter


Step 2: Set Metacity as your default start up window manager
Once in gconf-editor navigate to desktop>gnome>applications>window_manager

Screenshot-Configuration Editor - window_manager

under current and default replace each instance of:
/usr/bin/compiz with /usr/bin/metacity
it should like this when you're done:

Screenshot-Configuration Editor - window_manager-1


Step 3: Create a shortcut for starting Compiz-Fusion
right click the Applications Places System Menu
select the Edit Menu option

Screenshot-Main Menu

pick a location for your shortcut and select New Item box

Screenshot-Launcher Properties
Type: Application
Name: Compiz
Command: compiz --replace
COmment compiz window manager

An Compiz icon pack for your shortcut. Includes some old, new and proposed icons for Compiz.

Sunday, April 13, 2008

Overview of Ubuntu 8.04 Hardy Heron on the Dell 1501

Everything you need to get Ubuntu 8.04 running on your Dell Inspiron 1501.

Installation
Hardy installs with no problems. Whether you're using the LiveCD, Alternative Install or Wubi.

Wireless
Two Methods:
1. The Restricted Driver Manager can install the Broadcom B43 fireware.
Firmware cutter will not work when used through the Driver Manager. In order to install B43-fwcutter you need to use the terminal.
In a terminal Type:
sudo apt-get install b43-fwcutter

2. Use NDISwrapper to install the driver. This guide will walk you through the setup.

ATI Proprietary Driver
Two Methods:
1. The Restricted Driver Manager can install the the driver for ATI graphics card in the Dell 1501. ATI's 2.1.7281 fglrx driver is automatically installed, configured and 3D enabled. The best part is that the new Ubuntu repository fglrx driver supports AIGLX, no more XGL.

2. You can install the newest ATI driver that uses AIGLX yourself. You can find that guide here (use method two) or use Envy to install the newest ATI driver for you.

Compiz-Fusion
Compiz-Fusion is enabled once you install the ATI Propiety Driver.
To get the most out of Compiz try installing the advanced configuration tool.
In a terminal:
sudo apt-get install compizconfig-settings-manager

Media Codecs
Hardy Heron makes codec installation easy mp3, DVD, avi, aac, mpeg, wmv, asf, mov, flv, mp4, flash codecs are installed when you try to play them. If you like to add all the major codecs and make playback easy, check out my codec cheatsheet. The only thing not enabled in Ubuntu is reading encrypted DVDs. To add DVD playback and some other helpful media codecs to Ubuntu follow this guide.

Ethernet
Works out of the box. In order to do any of these guides you're going to need to plug in your Dell Inspiron 1501. Don't be cheap, go out and buy an Ethernet cable.

Brightness & Volume
Brightness (Fn Up/Down Arrow) and Volume (Fn Page Up/Page Dn) keyboard shortcuts both work with BIOS 1.70. Please leave a comment letting others know if your BIOS work.

Suspend & Hibernate
Both Suspend and Hibernate work with BIOS 1.70 and the Ubuntu repository ATI 2.1.7281 fglrx driver. Please leave a comment letting others know if your BIOS and/or ATI driver combination work. You can find a mini guide about BIOS flashing here.

Video Out
Works out of the box, Hardy's Screens and Resolutions (System>Administration>Screens and Resolutions) makes using multiple monitors a breeze. Configuration doesn't require editing your xorg.conf file.

Modem
The Conexant Modem driver is usually released by Dell once they switch their Linux machines over to the new version of Ubuntu. I'll update the site and this space when Dell releases the new driver.

Card Reader
Works out of the box.

Overall:
Hardy Heron is the Ubuntu release that Dell Inspiron 1501 owners have been waiting for. Everything works, you only need to install 3 drivers (ATI, wireless and modem). If you were hesitant about trying Ubuntu on your 1501, rest assured, it takes minimal skill and computer knowledge to setup.

Friday, April 11, 2008

NDISwrapper In Hardy Heron

When the Dell 1501 first came out there were no native wireless drivers for the internal Broadcom chipset, so NDiswrapper was the only way to get wireless working. NDiswrapper uses a wireless devices' Windows driver in Linux. It works surprisingly well. Using NDiswrapper allows you to run the Broadcom card in your Dell 1501 at full speed and connect to certain networks that the native Broadcom driver can't. In Hardy Heron there was a slight problem with NDiswrapper. I found the fix to get ssb from loading before NDiswrapper from this forum post. Thanks to Ubuntu Forum user Mazza558, NDiswrapper is working again on the Dell 1501.

If you are using the native Broadcom driver via the Driver Manager and it's working for all your day to day needs, I wouldn't recommend taking the time to change drivers.

If you have already enabled the Broadcom restricted driver, uninstall it before attempting this guide.


Step 1: Stop ssb From Loading Before NDISwrapper
Make a script for NDISwrapper's fix
In a terminal type:
sudo gedit /etc/init.d/wirelessfix.sh

Paste this into the file:
#!/bin/bash

modprobe -r b44
modprobe -r b43
modprobe -r ssb
modprobe -r ndiswrapper
modprobe ndiswrapper
modprobe b44

Point the terminal to your init.d file and make your script exectuable:
In a terminal type:
cd /etc/init.d/ && sudo chmod 755 wirelessfix.sh

Update and make it stick:
In a terminal type:
sudo update-rc.d wirelessfix.sh defaults

Then reboot
In a terminal type:
sudo reboot


Step 2: Get Needed Packages
To install ndiswrapper
In a terminal type:
sudo apt-get install ndiswrapper-utils-1.9 ndiswrapper-common

or you can also try:
sudo apt-get install ndiswrapper-utils-1.9* ndiswrapper-common

***If the terminal outputs an error message, telling you NDISwrapper could not be found, insert the Ubuntu disc you used to install Hardy Heron and manually search for the file.


Get the Windows driver for your Dell 1501
In a terminal type:
wget http://ftp.us.dell.com/network/R140747.EXE


Step 3: Get Everything Ready
Now we will make a folder.
In a terminal type:
mkdir ~/.drivers

Now we will move R140747.EXE (the Dell driver), to the folder we just made.
In a terminal type:
mv ~/R140747.EXE ~/.drivers


STEP 4: Driver Setup
In order for us to unzip the R140747.EXE driver we need to point your terminal to the /.driver folder.
In a terminal type:
cd ~/.drivers

Unzip the R140747.EXE driver
In a terminal type:
unzip -a R140747.EXE

We need to point your terminal to the DRIVER folder we just unzipped
In a terminal type:
cd ~/.drivers/DRIVER


Step 5: Configure The Windows driver With NDISwrapper
Now install the Windows driver
In a terminal type:
sudo ndiswrapper -i bcmwl5.inf
Then:
sudo ndiswrapper -l (that is a lowercase L)

You should see a message that says driver present, hardware detected.

Now finish installing the driver
In a terminal type:
sudo ndiswrapper -m
Then:
sudo modprobe ndiswrapper

YOU MUST REBOOT NOW!
In a terminal type:
sudo reboot

STEP 6: TEST WIRELESS
Your wifi light on your laptop should be illuminated. If not, you can always turn it on and off with the Fn+F2 (Function & F2 Key) and you're all set! Try running this to see if your wireless card is functioning properly.

In a terminal type:
sudo iwlist scanning
edited by pHreaksYcle

Wednesday, April 9, 2008

Firefox 3 Beta 5 Ramblings

I complained about Firefox 3 Beta 4 being included in the Alpha 5 release of Hardy Heron. The complaint was valid, at the time most plugins were not Firefox 3 compatible, spell check wasn't working and not having a fully working bowser was painful. Firefox is the most used program on my computer. Having a dwarfed version that makes it harder for me to surf the web was my only real complaint about Hardy Heron.


There are some good things about Firefox 3 Beta that leave me hopeful:
One of the big changes in Firefox 3 is the implementation of Gecko 1.9 and xulrunner. Firefox 3 fixes many bugs, improves standard compliance, and implements new web APIs. Firefox 3 is the first official release of a Mozilla browser to pass the Acid2 test. It also gets a better score on the Acid3 test than Firefox 2. Standards compliance is important.

A new internal memory allocator, jemalloc, is used rather than the default libc one. Firefox 2 had problems keeping memory usage stable. So far I haven't had any problems with Firefox 3, it's footprint has been minimal.

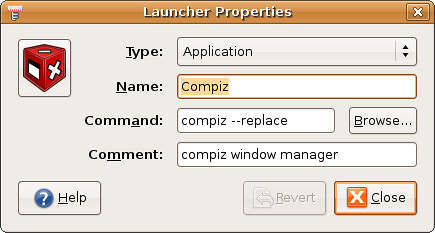
Gecko 1.9 uses Cairo as a graphics back end, allowing for improved graphics performance and better consistency of look and feel on various operating systems. I included a picture of my Firefox 3 setup below.
Firefox 3 Beta 5 - Screenshot
It fits perfectly with the look and feel of Ubuntu's human theme. I hated how Firefox 2 looks, I preferred 1.5's look; but after using Firefox 3 I think I'm ready to make the switch to the gtk theme.

Plugins are being updated to be compatible with Firefox 3 Beta 5 (and Firefox 3 in general). So most our of favorite plugins will be Firefox 3 ready within the next month.
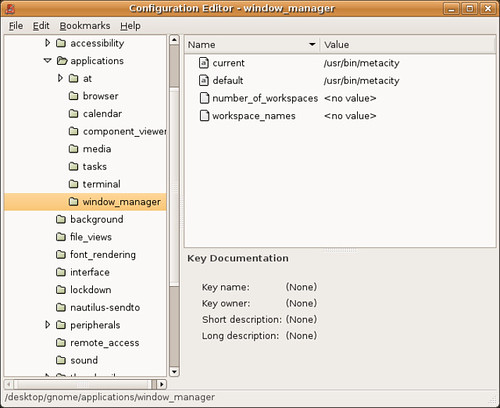

Some cool tweaks for Firefox 3:
Access FireFox's Configuration File
Type about:config into the URL address bar
Firefox 3 Beta 5 - about:config
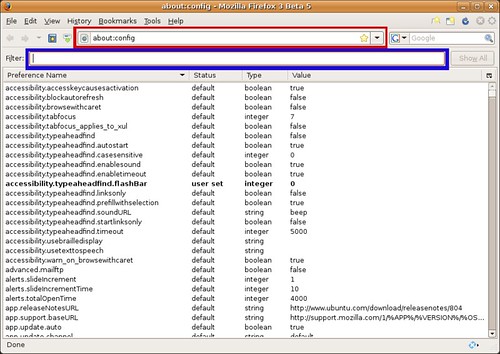
The red box is the url, where you type about:config
The Blue box is the filter box, it allows you to search through the about:config file and is where you type the green text commands.

Make Firefox to run faster:
Normally the browser will make one request to a web page at a time. When you enable pipelining it will make several at once, which really speeds up page loading.
Set "network.http.pipelining" to "true"
Set "network.http.proxy.pipelining" to "true"
Set "network.http.pipelining.maxrequests" to 15.
Right-click anywhereinside the firefox winodw and select New-> Integer.
Name it "nglayout.initialpaint.delay" and set its value to "0″.

Firefox downloads webpages from links it thinks you may click. This may make the "experience" seem faster but really it just bogs down Firefox and you PC.
Set "network.prefetch-next" to false

Turn off chrome tool tips, this causes little pop up windows to tell you what your mouse is hovering over. If you been using Firefox for as long or longer than I have (before 1.0) you really don't need to be told what the back button does. It also hinders dragging a bookmark into the bookmark toolbar folder, the tool tip gets in the way and prevents the drop from working.
Set "browser.chrome.toolbar_tip" to false

Customize backspace button, the Ubuntu default is set to scroll up when hit. I prefer it to work like it did in Windows and go back in my page history.
Set "browser.backspace_action" to either 0 or 1
0 - Pressing backspace button will go back a page in the session history
1 - Pressing backspace button will scroll up a page in the current document and
[Shift]+[Backspace] will scroll down.

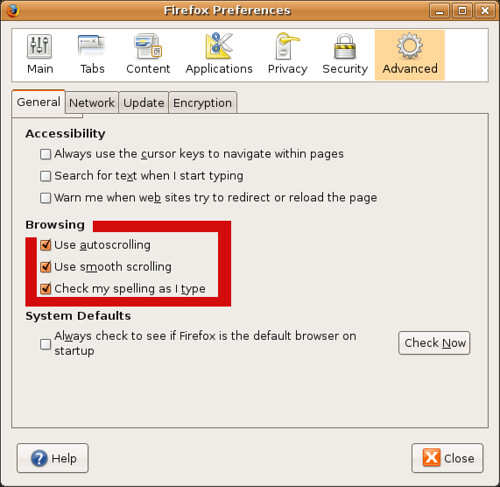
To enable auto scrolling & smooth scrolling go to Edit->Preferences and click Advanced. It allows you to middle click/touch pad scroll smoothly left, right, up and down web pages. It's enabled in Windows but not in Ubuntu
Firefox 3 Beta - Firefox Preferences


Some Helpful Firefox Plugins that have been upgrade to work with Firefox 3 Beta 5:
Foxmarks Bookmarks
If you use Firefox on more than one computer, you'll want Foxmarks. Install Foxmarks on each computer, and it will work silently in the background to keep your bookmarks synchronized. As a bonus, log in to my.foxmarks.com from any computer anywhere to access your bookmarks. The Firefox 3 version of Foxmarks Bookmarks is currently in beta and is only available if you sign up. Good news is that they're signing people up left and right.

Flashblock
Flashblock is an extension for the Mozilla, Firefox, and Netscape browsers that takes a pessimistic approach to dealing with Macromedia Flash content on a webpage and blocks ALL Flash content from loading. It then leaves placeholders on the webpage that allow you to click to download and then view the Flash content.

Adblock Plus
Right-click on a banner and choose "Adblock" from the context menu - the banner won't be downloaded again. Maybe even replace parts of the banner address with star symbols to block similar banners as well. Or you select a filter subscription when Adblock Plus starts up the first time, then even this simple task will usually be unnecessary: the filter subscription blocks most advertisements automatically.
edited by pHreaksYcle

Monday, April 7, 2008

Easy Media Codec Installation for Hardy Heron

This simple howto installs the most common restricted codecs in Heron, allowing you to play mp3, aac, DVD ,mp4, avi, wmv and many more formats. It also installs the codecs for ripping mp3s using the lame encoder and making DVD/CDs.

In a terminal type:
sudo apt-get install gstreamer0.10-plugins-ugly-multiverse gstreamer0.10-plugins-bad-multiverse gstreamer0.10-plugins-bad gstreamer0.10-plugins-ugly gstreamer0.10-ffmpeg libxine1-ffmpeg libdvdread3

In order to play copyrighted DVDs, you need to install the libdvdcss2 package. To do this you need to install the Medibuntu repository. You can find my howto here.

Once you install the Medibuntu repository
To play encrypted DVDs, in a terminal type:
sudo apt-get install libdvdcss2

To download the win32 codecs, in a terminal type:
sudo apt-get install w32codecs

To download the FFmpeg Encoders, in a terminal type:
sudo apt-get install ffmpeg

Medibuntu for Hardy Heron

Medibuntu (Multimedia, Entertainment & Distractions In Ubuntu) is a repository of packages that cannot be included into the Ubuntu distribution for legal reasons like copyright, license or patent restrictions. It also includes many popular media .debs for ffmpeg, w32codes, skype and google earth.

Ubuntu 8.04 Hardy Heron can't play encrypted DVDs out of the box. In order to play DVDs you need to install a couple of codecs. This guide will show you how to install the Medibuntu repository and codecs.

This will add the Medibuntu repository to your repository lists
In a terminal type:
sudo gedit /etc/apt/sources.list

Add this to the end of your source list:
## Medibuntu - Ubuntu 8.04 "hardy"
## Please report any bug on https://bugs.launchpad.net/medibuntu/
deb http://packages.medibuntu.org/ hardy free non-free


Then you have to add the GPG Key to authenticate the packages
In a terminal type:
wget -q http://packages.medibuntu.org/medibuntu-key.gpg -O- | sudo apt-key add - && sudo apt-get update

Now update your system to load the Medibuntu repository into your apt-get sources
In a terminal type:
sudo apt-get update

Download the DVDs playback packages
In a terminal type:
sudo apt-get install libdvdcss2 libdvdread3

edited by pHreaksYcle

Friday, April 4, 2008

Why NDISwrapper Didn't Work in Heron

The article doesn't apply anymore, NDISwrapper does work in Hardy Heron, you can find the fix here.

NDISwrapper is a free software driver wrapper that enables the use of Microsoft Windows drivers for wireless network devices (cards, USB modems, and routers), on Unix-like operating systems. Ndiswrapper works by implementing the Windows kernel and NDIS APIs, and dynamically linking the driver to this implementation.

With the release of Hardy Heron, I tried getting NDISwrapper working, as it was my prefered method of wireless on my Dell 1501. I tried a bunch of different methods but nothing worked for me. I was reading linux.slashdot.org today when I came across this article.

It explains why I was unable to get ndiswrapper to work in Hardy Heron. A change in the 2.6.24 kernel broke ndiswrapper by accidentally removing its access to GPL-only symbols. Without access to GPL-only symbols NDISwrapper is unable to implement the Windows kernel and NDIS APIs and link the driver.

Pavel Roskin attempted to patch the kernel to allow NDISwrapper to access those GPL-only symbols but Linus Torvalds shot down his patch. He stated, "I'm not seeing why ndiswrapper should be treated separately. If it loads non-GPL modules, it shouldn't be able to use GPLONLY symbols." He then went on to state, "ndiswrapper itself is *not* compatible with the GPL. Trying to claim that ndiswrapper somehow itself is GPL'd even though it then loads modules that aren't is stupid and pointless. Clearly it just re-exports those GPL ONLY functions to code that is *not* GPL'd."

Linus makes a excellent point, if NDISwrapper is going to abuse the use of GPL-only sysmbols by exporting them to code that is not GPL then they should not have access to GPL code. While it saddens me that the faster method of using the Broadcom card in my Dell Inspiron 1501 is gone, I do believe in the GPL.

Until then there's always:
sudo apt-get install b43-fwcutter
edited by pHreaksYcle