Recently a reader, PurplE, asked if he could copy or modify some of my articles for his blog or the Ubuntu wiki. I encourage all of you to use my work to help others. If you think you can do something better or translate my articles into another language please do. Just give me credit and link back to my site. Share the love, don't steal my content and call it your own.
redDEAD
Remember you can find my contact info here if you have questions or comments
I am looking for help. I want to write a SAMBA guide that doesn't suck. Simple printer sharing, and read only access to shared folders. If you want to help send me an email. redDEADresolve [gmail.com]
Lauren wrote: this is great, I've been reading the posts and I haven't seen any about dual booting yet, I was just wondering if it's easy to get my laptop (dell 1501) to dual boot and if so how. I've read about the whole partitioning with gparted and all. is that all I need to do? just make the swaps and install feisty fawn or am I missing something? thanks alot
The reason you haven't read anything about dual booting is because I don't on my Dell Inspiron 1501. But it really is that simple. The only thing you have to do is place the disc in the drive and Ubuntu does the rest. Best way to do it is to do a complete reinstall of Windows Vista or XP. The 1501 ships with some weird partitions so reformatting your drive as one large partition at first is best. Plus it gets rid of all that trail software your PC comes with. Then Ubuntu will create another partition for itself. Install Windows first then Ubuntu.
Only one thing to worry about is if you dual boot with Vista, the operating selection screen will list it as Windows XP. It really is Vista. You can change it but I wouldn't bother. Maybe another reader can help out with instructions.
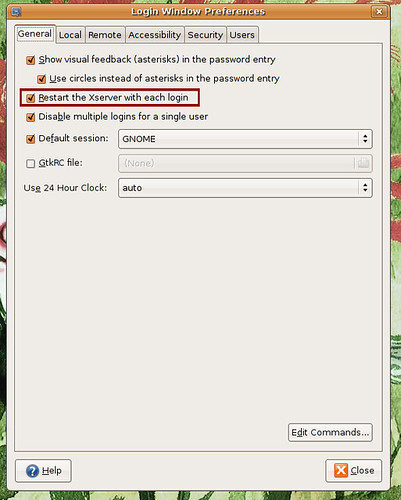
I've known about this problem for a while now but was hoping it was just my machine. The 1501 crashes upon logout in Feisty, the screen goes black and stays that way until you manually power it off. Thanks to PurplE we now have a fix. Where he found the fix
1. Go to System-->Administration-->Login Window 2. Check Restart the Xserver with each login 3. Apply the changes and restart your machine
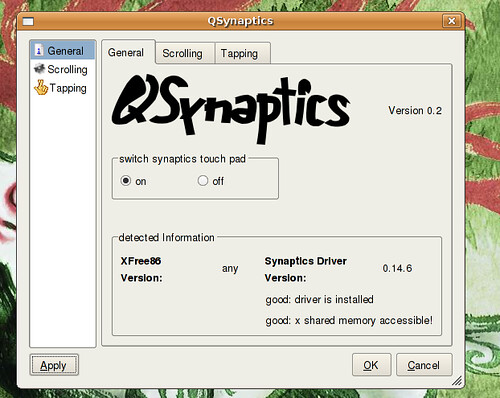
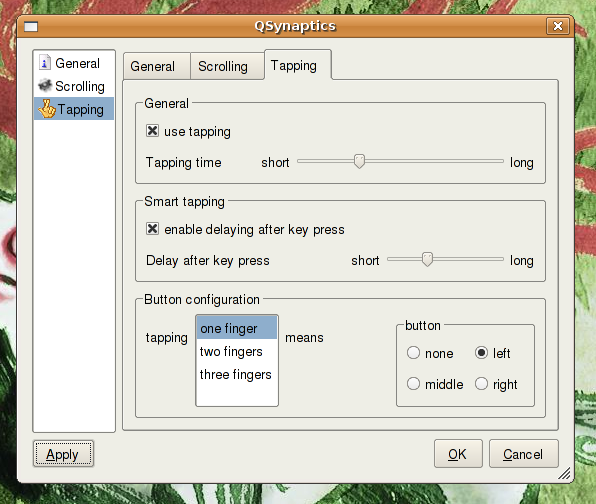
Typing on the Dell 1501 with big hands is a pain. The touchpad always gets in my way, I'll be typing and then lightly brush the surface of the touchpad and the mouse moves. For months I put up with it, knowing how to fix it. Today I finally took the 2 minutes to fix the problem. You add delay to the touchpad after a keystroke.
Download QSynaptics. This handy applications allows you to completely customize the synaptic touchpad on the 1501. In terminal type: sudo apt-get install qsynaptics
Now you need to edit you xorg.conf file to allow QSynaptics to customize your touchpad settings. In terminal type: sudo gedit /etc/X11/xorg.conf
This Brings up your xorg.conf file, you going to look for: Section "InputDevice" Identifier "Synaptics Touchpad"
Then your going to add this line to it: Option "SHMConfig" "on" Save File and Close
It should look very similar to this: Section "InputDevice" Identifier "Synaptics Touchpad" Driver "synaptics" Option "SendCoreEvents" "true" Option "Device" "/dev/psaux" Option "Protocol" "auto-dev" Option "HorizScrollDelta" "0" Option "SHMConfig" "on" EndSection
Restart Your PC or Just Restart X
Now You can use QSynaptics. In a terminal type: qsynaptics
Edit you mouse configuration any way you want!
If you want to be fancy and up a icon in your System>Preferences 1. Right click Systems 2. Select edit menus 3. Scroll down to Preferences and select it 4. Now look to the right of the window and select + New Item 5. You can put whatever you like here. Only command has to be the same. Type: Application Name: QSynaptics Command: qsynaptics Comment: Edit you Synaptic Settings 6. Select an Icon and hit OK
You can find the option for enabling delaying after a key press on the third tab.
Colin found the answer to a question I should have answered a log time ago. He writes: I've found that if you go to System > Preferences > Sessions, add a new command, call it whatever but run "qsynaptics -r", it loads the settings at login!
Well I forgot to mention how to get Feisty. There are three main ways to get a copy:
1. Order them free, you fill out a mailing form and Canonical will send them to you in about 6-8 weeks. No hassles, junk mail, no mailing lists, no email, nothing to buy later. You just get the disks for free. Order a couple extra and give them away to friends. Order them here
2. Download directly from a mirror. This not the best way, it puts strain on the servers. Use it only if you can't wait or can't bittorrent. Depending on your connection it takes a couple of hours. Download Ubuntu here
3. Torrent it. If you don't know what or how to use bittorent, select option 1 or 2. If you want try to learn more about Bittorent and how to go here. The torrents to download Ubuntu can be found at the bottom of this page. Bittorrent is the fastest and best way to get Ubuntu. You help others download it as you download.
Once you downloaded Ubuntu you need to burn it onto a disc. So either use you favorite burning program or you can use WindowsXP's built in iso burning. You just insert a blank CD/DVD into your drive, right click the .iso file you downloaded and select Send To, send it to your CD/DVD writer (for most people it will be named CD-RW Drive or DVD-RW Drive) and the disc will begin to burn.
These CD/DVD are live discs. This mean that you can put them into your machine and try using Ubuntu before you install it. Still not sure what a LiveCD is? Look here.
Readers with 2.1 or 2.4 BIOS have been reporting that they are unable to get Ubuntu Feisty Fawn 7.04 to install on their 1501s. The simple solution is to downgrade your BIOS back to 1.7. When you start up your PC there is a giant Dell splash screen. Right under it you can find your bios version. Get older BIOS from Dell's support website HERE
I will caution that if you are not comfortable with possibly ruining your laptop and turning it into a useless brick do not attempt to flash your BIOS.
REMEMBER YOU HAVE TO HAVE YOUR LAPTOP PLUGGED IN WHEN FLASHING.
UPDATED! The Dell Inspiron 1501 is ready for Ubuntu Feisty Fawn 7.04. Today the last remaining bugs were squashed. I highly recommend you count the days till Feisty is released or hop on the beta and start enjoying the ride.
Installation It's a simple matter of placing the Feisty disk into your DVD drive and installing. Takes all of 30 minutes and doesn't need pci=nomsi to install.
Wi-Fi The broadcom card shipped with the Dell 1501 still doesn't work out of box with Feisty. But ndiswrapper works and runs the card very fast. Installation is extremely easy, the guide can be found here. Feisty's avahi network manager is amazing, best I have ever used on any operating system. It's a must have for any mobile users.
Ethernet Works out of the box, just plug the cable in.
Modem Reported that it works with a little tweaking. Everyone who wants to run Feisty but is stuck in 1996 can breath easily.
Card Reader There was a bug in the 2.60 Linux kernel that caused the Ricoh card Readers the Dell 1501 shipped with to not work although they worked in Edgy. This has been fixed, card reader works great and now it asks if you'd like to empty the trash upon dismounting. Very convenient and works out of box.
ATI Driver ATI's 8.34.8 driver is working really well for me. Installation is a snap too. The restricted Driver Manager does all the work for you. You can install the driver with four mouse button clicks.
Media Codecs Feisty makes codecs easy, no more Automatix or struggling with adding a repo. MP3, DVD, avi, mpeg, wmv, asf, mov, flv, flash codecs are installed with four mouse clicks. The only thing not enabled is reading encrypted DVDs. Some programs can do it for you but if you'd like to do it in Totem use this guide. Word is you can buy it from Linspire's CNR which is being introduced in Feisty. Remember kids, Linux is free as in Freedom not money. If you have to pay to play DVD, bite the bullet. You saved hundreds on the OS.
Beryl It works and works pretty damn well. The trick is that you have to force bery-core to use 0.2.0~0beryl1 because later versions don't work with Xgl. It's not that hard of a hack. My guide can be found here.
Key Bindings Work out of box, volume control, brightness, mute any function+commands. I have my keyboard set to Generic 101-key PC. After installing Xgl & Beryl I kept my key binding to Gnome's Settings.
Hibernation Works out of box, never used hibernation before but I just tried it and think I like it.
This is the guide everyone has been waiting for, enjoy. The trick is that you have to force bery-core to use 0.2.0~0beryl1 because later versions don't work with Xgl. This not only works for the Dell Inspiron 1501 but works for any computer running an ATI card using Xgl.
Check ATI Driver In a terminal type: fglrxinfo
You should see this output on your terminal window: display: :0.0 screen: 0 OpenGL vendor string: ATI Technologies Inc. OpenGL renderer string: RADEON XPRESS Series OpenGL version string: 2.0.6334 (8.34.8)
Install Xgl & Beryl Add the Beryl repositories to your source list. In a terminal type: sudo gedit /etc/apt/sources.list
Add this line to Your Source Lists deb http://ubuntu.beryl-project.org/ feisty main save and close file
Grab the Key for the repository, in a terminal type: sudo wget http://ubuntu.beryl-project.org/root@lupine.me.uk.gpg -O- | sudo apt-key add -
Update Your System In a terminal type: sudo apt-get update
Now install Xgl & Beryl In a terminal type: sudo apt-get install xserver-xgl beryl-ubuntu beryl-manager Setting Up XGL In a terminal type: sudo gedit /usr/local/bin/startxgl.sh
and this to the file: #!/bin/sh Xgl :1 -fullscreen -ac -accel xv:pbuffer -accel glx:pbuffer & DISPLAY=:1 cookie="$(xauth -i nextract - :0 | cut -d ' ' -f 9)" xauth -i add :1 . "$cookie" exec dbus-launch --exit-with-session gnome-session save and close file
Then make the xgl script executable by entering this into a terminal: sudo chmod a+x /usr/local/bin/startxgl.sh
Creating a XGL Login Make the script, by typing this into a terminal: sudo gedit /usr/share/xsessions/xgl.desktop
add this text to the file: [Desktop Entry] Encoding=UTF-8 Name=Xgl Comment=Start an Xgl Session Exec=/usr/local/bin/startxgl.sh Icon= Type=Application save and close file
Change Your Repository Settings In a terminal type: sudo gedit /etc/apt/preferences
Then add this ext to the file Package: * Pin: release o=lupine Pin-Priority: 1000 save and close file
Update Your System In a terminal type: sudo apt-get update Roll Back Beryl-Core Downgrade beryl- core to a version that works with Xgl In a terminal type: sudo apt-get install beryl-core=0.2.0~0beryl1
Now you just have to log off and log into your Xgl session and run Beryl.
My mini starter guide for gaming on Ubuntu. If you like to try any of them out the copy and paste the apt-get command into a terminal.
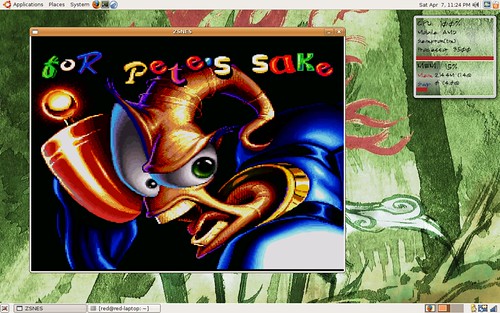
Super Nintendo Emulation on Ubuntu (Edgy/Feisty) I'm an old school gamer at heart, the 16-bit era was my glory days. I could be stuck on an island with only my SNES and I'd die happy.Like you really need me to link to the Super Nintendo wiki, but I did it anyway. sudo apt-get install zsnes *There are audio glitches with znes on the Dell Inspiron they can be fixed by using: sudo apt-get install libsdl1.2debian-esd
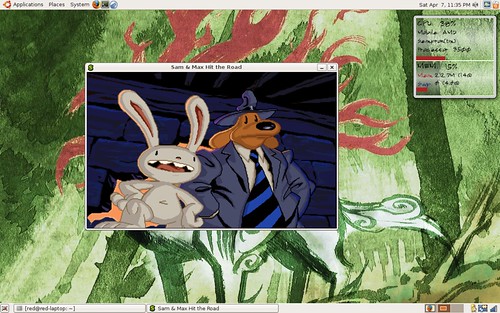
ScummVM on Ubuntu (Edgy/Feisty) I just got into the Lucas Arts classic point and click adventures. Sam & Max is fantastic. I'm too lazy to write more, check out it's wiki here sudo apt-get install scummvm
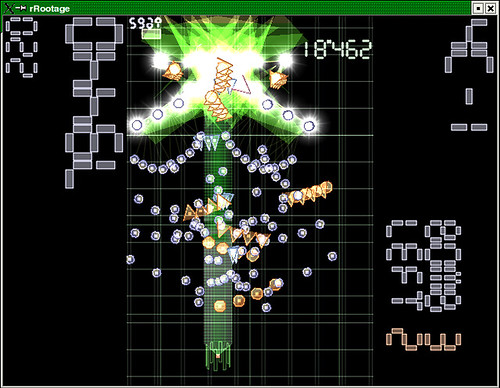
rrootage on Ubuntu (Edgy/Feisty) Probably the best "free" game I've ever played. I love shoot 'em ups and this one gives you all killer and no filler. Every stage is one big boss fight were you dodge bullets and blow stuff up. rrootage wiki sudo apt-get install rrootage
zses and scummvm do not come with any games. You have to find roms for them yourselves. It is illegal to own/download roms if you don't actually own the game. I will not tell you how to find roms or allow any comments on where to find, how to download or requests for roms.
This article was written by a reader of my blog, linrunix. It's a great guide enjoy. -redDEAD
kiba-dock is an application launcher that works like Mac OSX's dock. It allows you to put your favorite applications on "dock" on your desktop for quick and easy access. Check Out the Video, start drooling.
Note: For a better understanding every terminal command is in blue letters and the Menus and buttons of each application is inside of “ ”.
First we remove and purge kiba-dock (if we got it install) sudo apt-get remove –purge kiba-dock
Then we install the necessary packages for compiling kiba-dock sudo apt-get install automake1.9 build-essential cvs libpango1.0-dev libgtk2.0-dev libgconf2-dev libglitz-glx-dev librsvg2-dev checkinstall libglade2-dev
Now we download the kiba-dock source wget http://usuarios.lycos.es/abrahamtamayo/kiba-dock-0.1.tar.bz2
Now we untar the source in a folder called kiba-dock (you don't need to create it.) tar -xf kiba-dock-0.1.tar.bz2
Then we move to the kiba-dock folder created by the above command. cd kiba-dock
Now we generate the compile files....... ./autogen.sh
Now.... Start Compiling... make
Compiling.... Almost done!. make install-schemas
Now... this is the last one. sudo make install
Now we have kiba-dock install in our system we can run it just by typing this in a terminal: kiba-dock
(it should bring a blue bar, you can right-click the bar and go to "Kiba Utils" and then "systray" to have a configuration applet on the upper panel.)
Now we are going to drag-and-drop some launchers into the blue bar.
Go to "Applications" in the upper panel and find the application you want.... drag it and drop it in the blue bar.
Now let's make kiba dock start every time you log in. (for those who want it. you can start it by yourself running the "kiba-dock" command or pressing ALT+F2 and writing "kiba-systray.py" this one comes with the configuration applet)
to make it start every time we log in.... go to "System" in the upper panel then "Preferences" then "Sessions" then "Startup Programs" then click "Add" and write this "kiba-systray.py" then "Close".... and now we're done!!!
Enjoy your kiba-dock. -linrunix
linrunix also translated it into spanish
kiba-dock es una barra de lanzadores que funciona como Mac OSX's dock. este te permite agregar tus aplicaciones favoritas a la barra para tener acceso mas fácil y rápido a las mismas. Observen el vídeo, y vean lo que creían imposible.
Nota: Para un mejor entendimiento cada comando esta en negrita y los menús y botones de cada aplicación están dentro de “ “.
Primero removemos y purgamos kiba-dock (si lo tenemos instalado) sudo apt-get remove –purge kiba-dock
Después instalamos los paquetes necesarios para compilar kiba-dock sudo apt-get install automake1.9 build-essential cvs libpango1.0-dev libgtk2.0-dev libgconf2-dev libglitz-glx-dev librsvg2-dev checkinstall libglade2-dev
Ahora descargamos el souce wget http://usuarios.lycos.es/abrahamtamayo/kiba-dock-0.1.tar.bz2
Luego descomprimimos el source en un folder llamado kiba-dock (usted no necesita crearlo.) tar -xf kiba-dock-0.1.tar.bz2
Después nos movemos al directorio kiba-dock creado por el comando anterior cd kiba-dock
Ahora generamos los archivos para compilar....... ./autogen.sh
Luego.... Comenzamos a compilar....... make
Compilando.... Casi terminamos!. make install-schemas
Luego... este es el ultimo. sudo make install
Ya tenemos kiba-dock instalado en nuestro sistema para ejecutarlo escribimos el siguiente comando en un terminal: kiba-dock
(ahora debe haber aparecido una barra azul en la parte de abajo, puedes hacerle click-derecho a la barra e ir al menú “Kiba Utils” y luego haces click en “systray” para tener un applet de configuración en el panel superior de ubuntu.)
Ahora agregaremos algunos lanzadores al kiba-dock (lo arrastraremos a la barra azul.)
Vamos a “Applications” en el panel superior de ubuntu buscamos la aplicación que queremos..... y la arrastramos a la barra azul.
Ahora hagamos que kiba-dock inicie automático cada vez que iniciemos sección (Para los que quieran. tu puedes iniciarlo manualmente ejecutando el comando kiba-dock o presionando ALT+F2 y escribiendo "kiba-systray.py" este iniciara con el applet de configuración)
para hacerlo iniciar automático cada vez que iniciemos sección... vamos a "System" en panel de arriba luego "Preferences" después "Sessions" y luego "Startup Programs" después hacemos click en "Add" y escribimos "kiba-systray.py" luego hacemos click en "Close".... y Terminamos!!!
Disfruta tu kiba-dock.
edited by pHreaksYcle { I don't know a lot of Spanish =) }
Ubuntu 7.04 Feisty Fawn makes WiFi fun in Linux. Switching WiFi networks for me in Edgy with my Dell 1501 was chore, I loathed it. Today I spent the day driving around Chicago hopping from on wi-fi network to another. Clicked my WiFi icon, saw what networks were available and connected. No restarting, no logging off, no terminal commands. It just worked.
Feisty includes Avahi, it is a free Zeroconf implementation, including a system for multicast DNS/DNS-SD service discovery. It allows programs to publish and discover services and hosts running on a local network with no specific configuration. For example you can plug into a network and instantly find printers to print to, files to look at and people to talk to.
In Feisty Avahi works like this, you set you connection to roaming, left click the WiFi icon, a list pulls up with available networks including security and signal strength, and then you select your network.
This features ensure I'll never use edgy eft on a laptop again.
Thanks for your support! R Duthie Steven B Matthew D Peter A Brian L Leslie H John J S John A R Amaury N G Shih-gian L Natashe F K Gabriel N Stylus Grooves Aaron C