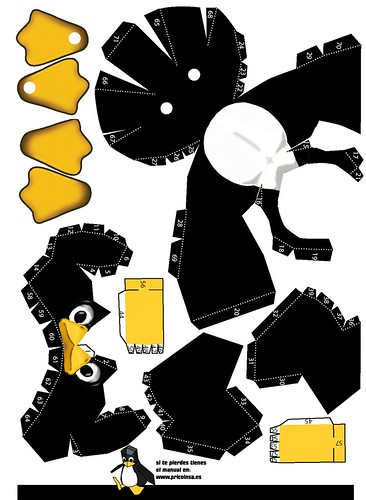
I don't have a picture of mine, but it turned out great and looks very similar to the famous logo image. It is the first papercraft I have ever done, and I was able to complete it with little difficulty. I have some tips for anyone trying to make their own, though:
Those white circles on the feet and bottom should be cut out, not left the way they are. Try to make them the exact size indicated.
Do yourself a favor and don't glue tabs 22-29 until just before you do 67-71. This will make it a whole lot easier to attach the arms and head.
Be sure that you do 67-71 in numerical order, not the order you would assume when looking at them.
After tab 44, tabs 46-50 go through the hole in one of the feet so that they stick out past the plain side. Then, you fold 46-50 out, glue them to the plain side of the foot, and glue the plain side of a hole-less foot over top of that. The end result is a foot colored on both sides with a tube protruding from it. Do likewise with the other foot and leg.
The arms are tricky to attach to the body. Use common sense and you'll get it to work eventually (if you run Linux, you are probably the DIY type and will have no problem).
Tabs 14, 20, 21, 44, 45, 65, 66, 67, 68, and especially 55 and 56 should not be folded over as they do not need a crease, and will work better without one. For he rest, I would recommend folding all of them before you even start gluing.
I used a glue stick as the adhesive, it worked great and dried fast.
I recommend attaching the legs last, so they are not in the way during assembly. Just put tabs 56 and 57 (aka the end of the leg tubes) through the holes in the body without glue.
After you are done, you will probably want to get rid of all the white dotted lines along the seams. This is easy to do with a sharpie or other permanent marker. However, just below the chin there is a sharp inside angle which will require a very fine-point pen or some other ingenious trick to get at.
I would certainly recommend this project. It took me maybe 4-5 hours to complete.
Thanks for your support! R Duthie Steven B Matthew D Peter A Brian L Leslie H John J S John A R Amaury N G Shih-gian L Natashe F K Gabriel N Stylus Grooves Aaron C


3 comments:
Sorry about the rubbish quality, the only camera i had to hand was an old webcam.
http://www.myfilestash.com/userfiles/thesimonator4/papertux.jpg
I don't have a picture of mine, but it turned out great and looks very similar to the famous logo image. It is the first papercraft I have ever done, and I was able to complete it with little difficulty. I have some tips for anyone trying to make their own, though:
Those white circles on the feet and bottom should be cut out, not left the way they are. Try to make them the exact size indicated.
Do yourself a favor and don't glue tabs 22-29 until just before you do 67-71. This will make it a whole lot easier to attach the arms and head.
Be sure that you do 67-71 in numerical order, not the order you would assume when looking at them.
After tab 44, tabs 46-50 go through the hole in one of the feet so that they stick out past the plain side. Then, you fold 46-50 out, glue them to the plain side of the foot, and glue the plain side of a hole-less foot over top of that. The end result is a foot colored on both sides with a tube protruding from it. Do likewise with the other foot and leg.
The arms are tricky to attach to the body. Use common sense and you'll get it to work eventually (if you run Linux, you are probably the DIY type and will have no problem).
Tabs 14, 20, 21, 44, 45, 65, 66, 67, 68, and especially 55 and 56 should not be folded over as they do not need a crease, and will work better without one. For he rest, I would recommend folding all of them before you even start gluing.
I used a glue stick as the adhesive, it worked great and dried fast.
I recommend attaching the legs last, so they are not in the way during assembly. Just put tabs 56 and 57 (aka the end of the leg tubes) through the holes in the body without glue.
After you are done, you will probably want to get rid of all the white dotted lines along the seams. This is easy to do with a sharpie or other permanent marker. However, just below the chin there is a sharp inside angle which will require a very fine-point pen or some other ingenious trick to get at.
I would certainly recommend this project. It took me maybe 4-5 hours to complete.
Thanks for the info marcusw
Post a Comment